Best Ever Easy Portuguese Custard Tarts (Pastel de Nata) Recipe
Oh, the magic of a perfect Pastel de Nata! I still remember my first bite. It was a rainy Sunday afternoon, years ago, and I was curled up on the sofa, scrolling through travel photos of Lisbon. A sudden craving for something utterly comforting and a little bit exotic hit me. That day, I dove headfirst into trying to recreate the iconic Easy Portuguese Custard Tarts (Pastel de Nata) in my own kitchen.
My grandmother always said the best food tells a story, and these tarts certainly do. The journey was filled with a few learning curves (soggy bottoms, anyone?), but eventually, I cracked the code. This recipe, perfected through countless Sunday baking sessions, has become a cherished family favorite, bringing the vibrant flavors of Portugal right into our home.
It’s more than just a dessert; it’s an experience. Imagine a crisp, flaky crust giving way to a rich, creamy, vanilla-infused custard, crowned with those signature blistered, caramelized spots. This recipe is your ticket to achieving that golden perfection, delivering an unforgettable sweet treat that’s surprisingly straightforward to make. Get ready to impress everyone!
Why You’ll Love This Recipe
❤️ Here’s why these Easy Portuguese Custard Tarts (Pastel de Nata) will become your new go-to:
- Authentic Flavor, Simplified: We’ve taken the essence of traditional Pastel de Nata and adapted it for the home baker. You’ll get that incredible depth of flavor without needing to fly to Lisbon! The balance of sweet, creamy custard with a hint of lemon and cinnamon is just divine.
- Crispy, Flaky Perfection: Using store-bought puff pastry is our little secret for achieving that coveted ultra-flaky, shatteringly crisp crust with minimal effort. No complicated dough folding required, but all the delicious results.
- Creamy, Velvety Custard: The custard filling is the heart of these tarts. It’s smooth, rich, and melts in your mouth, infused with beautiful vanilla notes. Getting that perfect consistency is key, and we’ll guide you every step of the way.
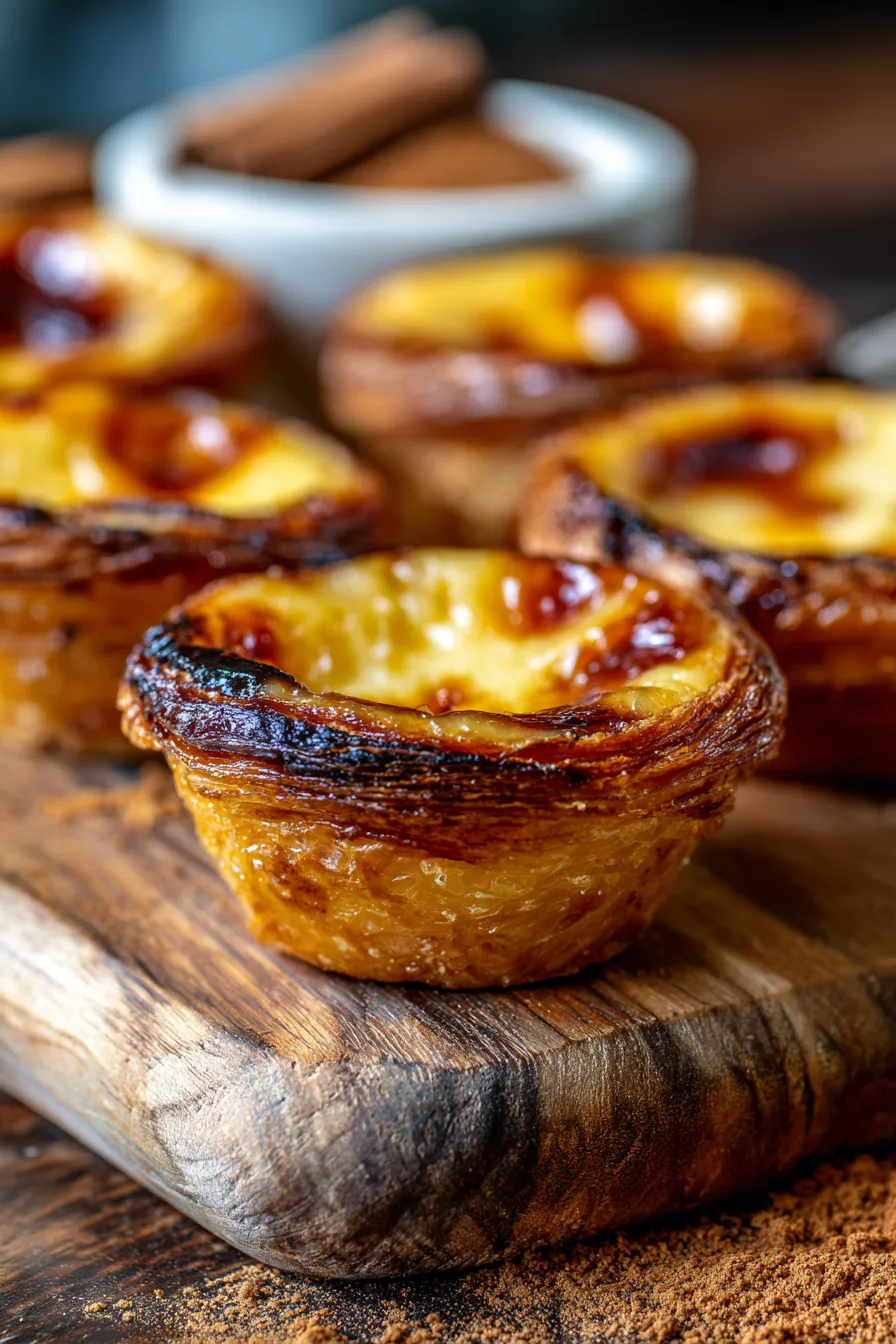
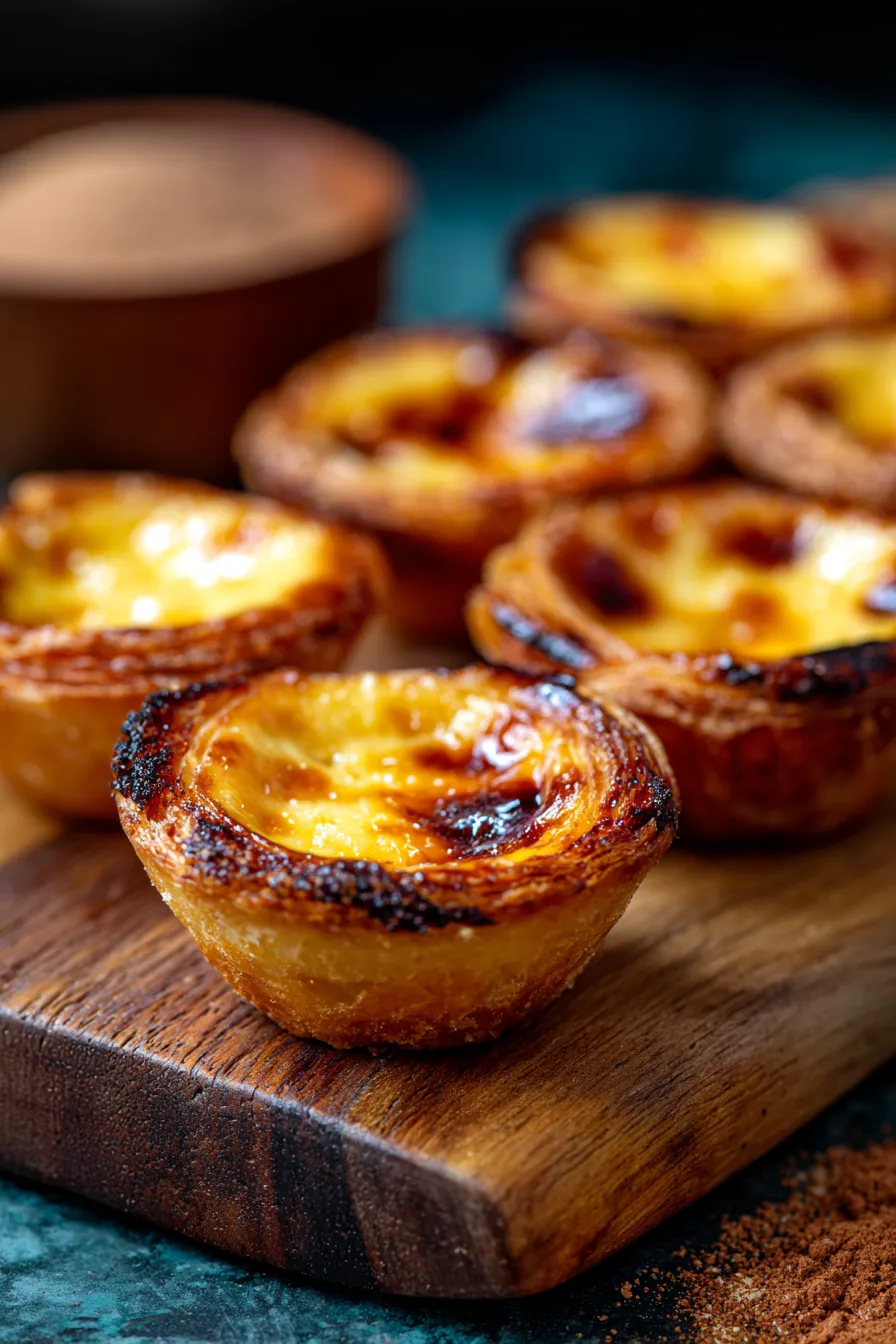
- That Signature Caramelized Top: The slightly charred, blistered tops are what make Pastel de Nata instantly recognizable and irresistible. Our high-heat baking method ensures you get those gorgeous, dark spots that add a delightful bitter contrast to the sweet filling. It’s a visual and textural masterpiece!
- Impressively Easy: While they look like they came straight from a professional bakery, these tarts are surprisingly approachable for any skill level. The steps are clear, concise, and designed for success, making them a fantastic baking project for a cozy weekend.
- Perfect for Any Occasion: Whether it’s a brunch gathering, an afternoon tea, a special dessert for dinner, or simply a sweet treat to brighten your day, these tarts fit the bill. They’re elegant enough for guests but comforting enough for a quiet moment.
- Freezer-Friendly: You can enjoy these delicious tarts fresh, but they also freeze beautifully, both baked and unbaked. This means you can always have a stash of these delightful Portuguese treasures ready for a craving or unexpected guests.
What You Need
You only need a few simple pantry staples for this recipe! Most of the ingredients are likely already in your kitchen, like everyday dairy, sugar, and flour. Check the full printable recipe card below for detailed measurements and a complete list.
Expert Tips
💡 Master your Pastel de Nata with these pro tips:
- Roll Your Puff Pastry Thin: When using store-bought puff pastry, roll it out slightly thinner than it comes. This helps create more layers and a crispier tart shell. Aim for about 1/8-inch thickness, then roll it up tightly like a scroll for maximum flakiness.
- Chill the Rolled Pastry Log: After rolling the puff pastry into a log, chill it in the refrigerator for at least 15-20 minutes. This makes it much easier to slice neatly and prevents it from becoming too sticky or difficult to handle.
- Press Dough Evenly into Molds: When pressing the pastry slices into your tart molds, focus on creating an even thickness, especially around the edges. A thinner bottom and slightly thicker sides are ideal. Use your thumbs, dipped lightly in flour if needed, to achieve a uniform lining.
- Don’t Overfill the Molds: Fill each pastry-lined mold with custard only about 3/4 full. The custard will puff up during baking, and overfilling can lead to spillage and a less appealing presentation.
- High Heat is Crucial for Blistering: The secret to those beautiful caramelized, blistered tops is very high oven heat. Preheat your oven to its maximum temperature (usually 500-550°F or 260-290°C) with the rack placed high. The intense heat cooks the custard quickly and caramelizes the sugars on top.
- Keep an Eye on the Tarts: Because of the high heat, these tarts bake very quickly – often in under 15 minutes! Stay by the oven and watch for those dark spots to appear. They go from perfectly golden to burnt quickly, so vigilance is key.
- Cool Completely for Best Texture: While tempting to eat warm, allowing the tarts to cool completely in their molds on a wire rack is essential. This allows the custard to set properly and the crust to become truly crisp. Don’t rush this step!
- Use Good Quality Ingredients: Since there are so few ingredients, the quality really shines through. Use fresh, large egg yolks, good quality vanilla extract (or a vanilla bean), and fresh lemon zest for the best flavor.
- Prevent a Soggy Bottom: Ensuring your oven is hot enough is one key. Also, pressing the dough firmly into the molds helps create a barrier. If you find your bottoms are still a bit soft, try baking them for an extra minute or two, or place the tray on a preheated baking steel or stone.
- Serving Suggestion: While perfect on their own, a light dusting of ground cinnamon or powdered sugar just before serving adds an extra layer of flavor and visual appeal.
Variations & Substitutions
- Gluten-Free Option: Look for gluten-free puff pastry in specialty grocery stores, or make your own almond flour-based tart crust. The custard itself is naturally gluten-free.
- Dairy-Free Custard: You can experiment with unsweetened almond milk or coconut milk (from a carton, not canned) in place of cow’s milk for the custard. Note that the texture may be slightly different but still delicious.
- Flavor Boosters: For an extra citrusy kick, add a touch of orange zest along with the lemon. A splash of rum or a few drops of almond extract could also be stirred into the cooled custard for a gourmet touch.
- Spice It Up: While cinnamon is classic, a tiny pinch of nutmeg in the custard or a dash of cardamom can add an interesting aromatic twist.
- Individual vs. Larger Tart: While traditionally individual, you can bake this in a larger tart pan for a family-style dessert. Just adjust baking time accordingly and ensure the custard is set in the center.

Storage & Freezing
- Room Temperature: Freshly baked Pastel de Nata are best enjoyed the same day. They can be stored at room temperature in an airtight container for up to 1 day, though the crust will soften slightly.
- Refrigerator: For longer storage, keep them in an airtight container in the refrigerator for up to 3 days. Reheat gently in a preheated oven (350°F/175°C) for 5-7 minutes to crisp up the crust before serving.
- Freezing Baked Tarts: Once completely cooled, wrap individual tarts tightly in plastic wrap, then place them in a freezer-safe bag or container. They can be frozen for up to 1 month. Thaw at room temperature and reheat in the oven for the best texture.
- Freezing Unbaked Tarts: You can also prepare the tarts up to the point of filling, then flash freeze them on a baking sheet until solid. Once frozen, transfer them to a freezer-safe bag and store for up to 1 month. Bake directly from frozen, adding an extra 5-10 minutes to the baking time.
FAQ
Why are my Pastel de Nata bottoms soggy?
Soggy bottoms usually occur if the oven isn’t hot enough, if the pastry isn’t pressed thinly enough, or if the tarts are left in the molds too long after baking. Ensure your oven is at its highest temperature and consider placing the molds on a preheated baking steel or stone. Remove them from the molds as soon as they’re cool enough to handle.
Can I use a different type of pastry?
While puff pastry gives the characteristic flaky texture, you could use a shortcrust or pie crust for a different result. However, for an authentic Pastel de Nata experience, puff pastry is highly recommended for its numerous delicate layers.
How do I get those iconic blistered, dark spots on top?
The key is extremely high heat! Your oven should be preheated to its maximum temperature (around 500-550°F or 260-290°C). Place the tarts on the highest rack closest to the broiler element (but don’t use the broiler directly unless you’re very careful). The sugars in the custard will caramelize and blister rapidly under this intense heat.
What kind of molds should I use?
Traditional Pastel de Nata are baked in specific non-stick tartlet molds, often made of tin or carbon steel, about 2.5-3 inches in diameter and 1 inch deep. Muffin tins can work in a pinch, but the shallower sides of tartlet molds help achieve a crispier edge and better blistered top.
There you have it – your guide to baking truly spectacular Easy Portuguese Custard Tarts (Pastel de Nata). These little golden gems are more than just a dessert; they’re a taste of tradition, a moment of comfort, and a testament to the simple joys of home baking. Don’t forget to pin this recipe for later, and let me know in the comments when you give it a try!

Easy Portuguese Custard Tarts (Pastel de Nata) – Best Recipe
Ingredients
- 1 sheet (14 oz / 390g) puff pastry, thawed
- 1 cup (200g) granulated sugar
- 1/2 cup (120ml) water
- 1 cinnamon stick
- 1 strip lemon peel (about 2 inches long)
- 1 1/2 cups (360ml) whole milk
- 1/4 cup (30g) cornstarch
- 6 large egg yolks
- 1/2 teaspoon vanilla extract (optional, but recommended)
- Extra flour for dusting
Instructions
- Step 1 Prepare the puff pastry: Lightly flour your work surface and roll the puff pastry into a rectangle about 1/8-inch thick. Tightly roll the pastry into a log, starting from one long side. Wrap in plastic wrap and chill for 15-20 minutes.
- Step 2 Make the simple syrup: In a small saucepan, combine sugar, water, cinnamon stick, and lemon peel. Bring to a boil over medium-high heat, stirring until sugar dissolves. Reduce heat and simmer for 3-5 minutes until slightly thickened. Remove from heat and let cool. Discard cinnamon stick and lemon peel.
- Step 3 Prepare the custard base: In a separate saucepan, whisk together milk and cornstarch until smooth. Cook over medium heat, stirring constantly, until the mixture thickens to a pourable custard (about 5-7 minutes). Do not boil.
- Step 4 Temper the egg yolks: In a bowl, whisk the egg yolks. Gradually pour about half of the warm milk mixture into the egg yolks, whisking continuously to temper them. Pour the tempered egg yolk mixture back into the saucepan with the remaining milk mixture. Whisk well.
- Step 5 Combine custard and syrup: Slowly whisk the cooled simple syrup into the custard mixture. Stir in vanilla extract, if using. Strain the custard through a fine-mesh sieve to ensure a silky-smooth consistency. Let cool slightly.
- Step 6 Prepare the molds: Preheat oven to its highest setting (500-550°F / 260-290°C) with a rack placed in the upper third of the oven. Lightly grease 12 standard muffin tins or specific Pastel de Nata molds.
- Step 7 Shape the pastry: Remove the chilled puff pastry log from the refrigerator. Slice the log into 12 equal pieces (about 1/2 inch thick each). Place one piece, cut-side up, into each prepared mold. Using your floured thumbs, press the pastry evenly from the center outwards to line the mold, creating a thin base and slightly thicker sides.
- Step 8 Fill and bake: Pour the cooled custard mixture into each pastry-lined mold, filling about 3/4 full. Bake for 10-15 minutes, or until the pastry is golden brown and flaky, and the custard is deeply caramelized and blistered on top. Watch closely as they can burn quickly.
- Step 9 Cool and serve: Carefully remove the tarts from the oven. Let them cool in the molds for a few minutes before transferring them to a wire rack to cool completely. Serve warm or at room temperature, optionally dusted with ground cinnamon.