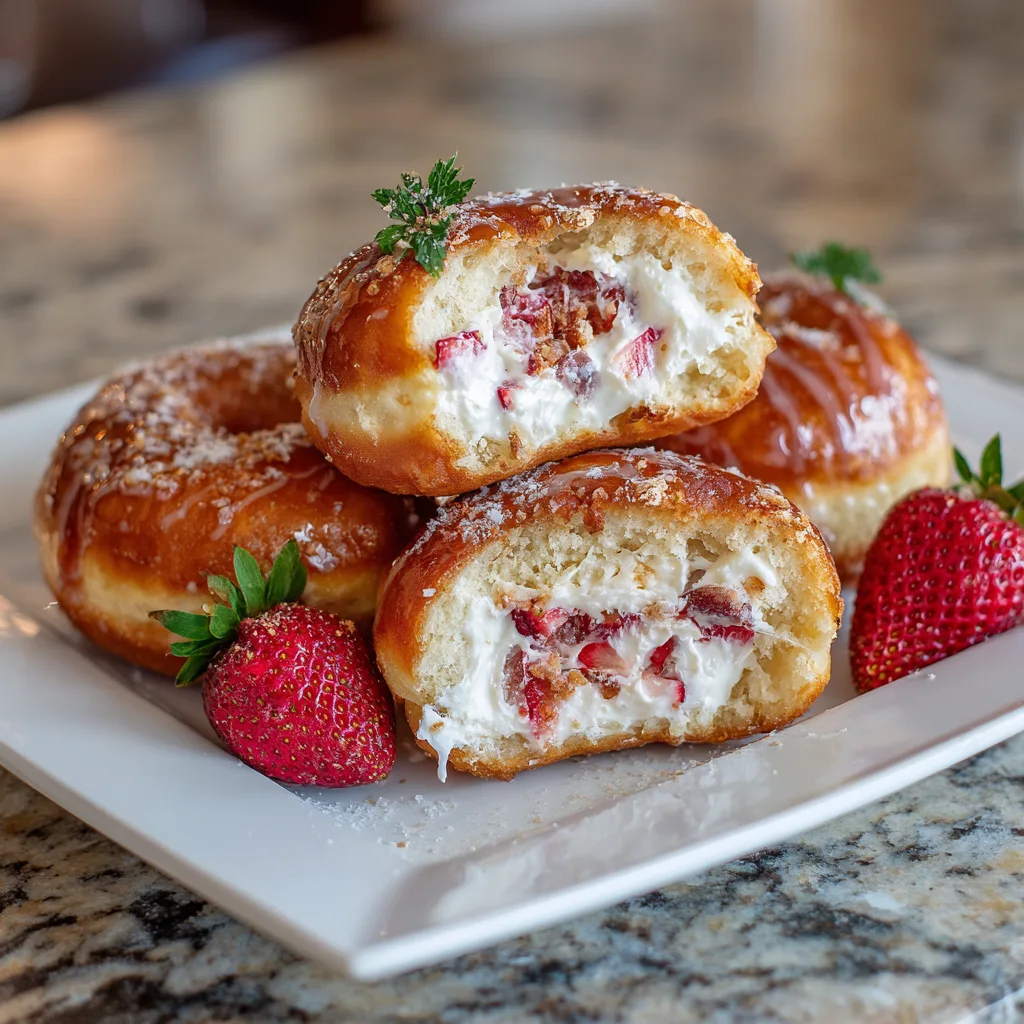
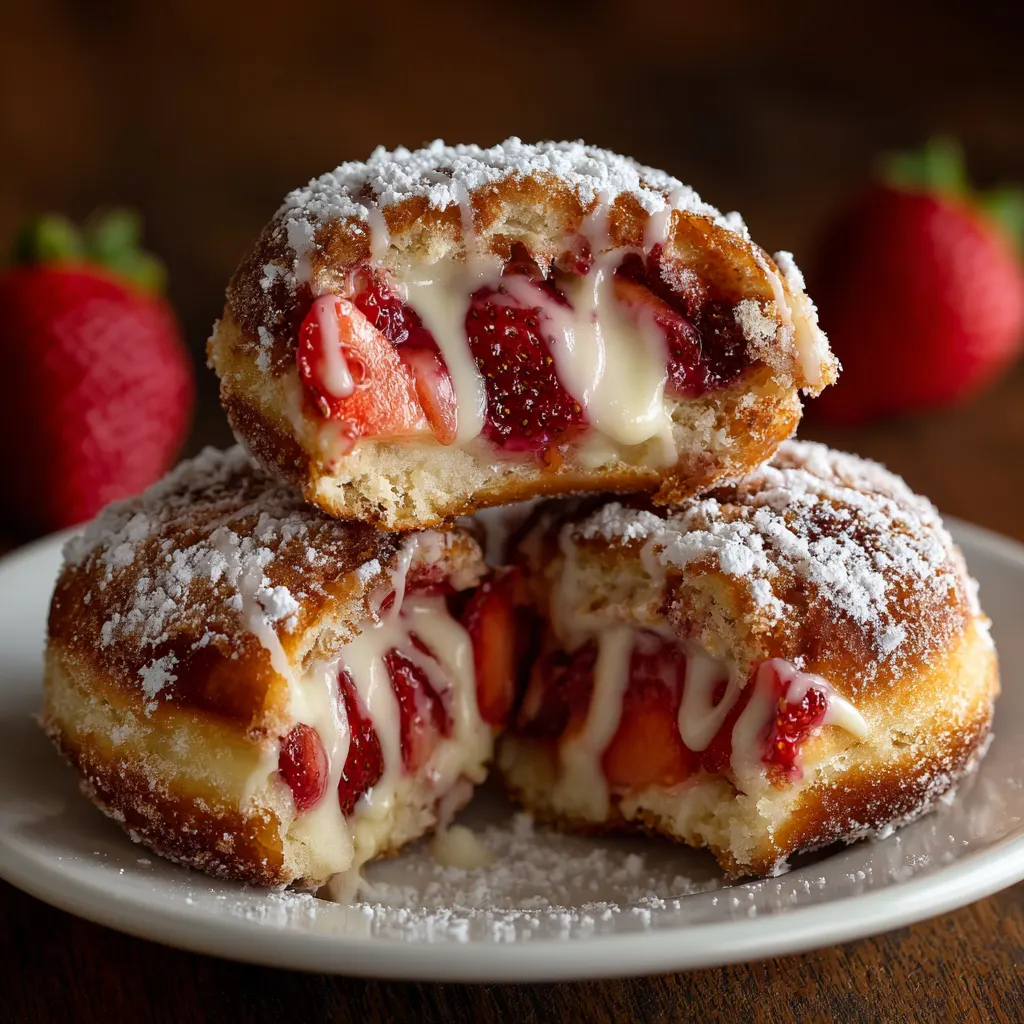
The Ultimate Guide to Strawberry Cheesecake Stuffed Donuts: A Recipe for Decadence
The intersection of two beloved desserts—the airy, pillowy richness of a homemade doughnut and the creamy, bright tang of strawberry cheesecake—creates a confection that is nothing short of transcendent. The Strawberry Cheesecake Stuffed Donut is an indulgence that perfectly balances complex textures and vibrant flavors. It elevates the simple fried dough into a dessert masterpiece, suitable for any occasion, from a decadent brunch to a spectacular finale for dinner. Achieving this balance requires careful attention to detail, from selecting the finest ingredients for the enriched dough to perfectly chilling and piping the signature strawberry cheesecake filling. For those ready to embark on this journey of pastry excellence, here is the foundational recipe for creating these extraordinary treats at home.
Ingredients
I. For the Enriched Doughnuts (Makes 14-16)
-
Yeast & Starter:
-
1 envelope (2¼ tsp) active dry yeast
-
½ cup warm whole milk (105°F–115°F / 40°C–46°C)
-
1 tsp granulated sugar
-
-
Dry Ingredients:
-
3¼ cups (400g) all-purpose flour, plus more for dusting
-
¼ cup (50g) granulated sugar
-
1 tsp salt
-
1 tsp ground mace (or nutmeg)
-
-
Wet Ingredients:
-
2 large egg yolks, room temperature
-
½ cup (1 stick / 113g) unsalted butter, softened and cubed
-
-
Frying & Coating:
-
8 cups neutral frying oil (vegetable, canola, or tallow)
-
1 cup granulated sugar (for coating)
-
II. For the Strawberry Cheesecake Filling
-
Cream Base:
-
8 oz (227g) full-fat cream cheese, softened
-
½ cup (118ml) heavy cream, cold
-
½ cup (60g) powdered sugar
-
1 tsp pure vanilla extract
-
-
Strawberry Compote/Jam:
-
½ cup high-quality strawberry jam or compote
-
(Optional: 2 Tbsp freeze-dried strawberry powder for enhanced color/flavor)
-
Step-by-Step Instructions
Part I: Preparing the Doughnuts
-
Activate the Yeast: In the bowl of a stand mixer, combine the warm milk, 1 tsp of sugar, and the yeast. Let stand for 5–10 minutes until foamy.
-
Mix the Dough: Add the flour, remaining ¼ cup of sugar, salt, and egg yolks to the yeast mixture. Using the dough hook attachment, mix on low speed until a shaggy dough forms.
-
Knead and Enrich: Increase speed to medium-low and knead for 5 minutes. Slowly add the softened butter, one cube at a time, allowing each piece to incorporate before adding the next. Continue kneading for 8–10 minutes until the dough is smooth, elastic, and pulls away cleanly from the sides of the bowl.
-
First Rise (Bulk Fermentation): Transfer the dough to a lightly oiled bowl, turn to coat, cover with plastic wrap or a kitchen towel, and let rise in a warm, draft-free place until doubled in size (typically 1.5 to 2 hours).
-
Shape the Doughnuts: Gently punch down the dough to release air. Turn it out onto a lightly floured surface. Roll the dough to about ½-inch thickness. Using a round cutter (2.5 to 3 inches), cut out 14–16 dough circles.
-
Second Rise (Proofing): Place the cut dough circles onto parchment paper squares (this helps with easy transfer to the oil). Cover loosely and let rise again until noticeably puffy (about 30–45 minutes). They should look inflated, but not quite doubled.
Part II: Frying and Coating
-
Heat the Oil: In a large, deep pot or Dutch oven, heat the neutral oil to 350°F–375°F (175°C–190°C). Use a kitchen thermometer to monitor the temperature precisely.
-
Fry the Doughnuts: Carefully lift the doughnuts, still on their parchment squares, and gently drop them into the hot oil (the paper will come off quickly; remove it with tongs). Fry in batches of 3–4 to maintain the oil temperature. Fry for about 1 minute per side until golden brown.
-
Drain and Coat: Use a slotted spoon or tongs to remove the fried doughnuts and immediately place them on a paper towel-lined wire rack to drain excess oil. While still slightly warm, roll the doughnuts in the bowl of granulated sugar until fully coated. Set aside to cool completely.
Part III: Making the Filling and Assembly
-
Prepare the Filling: In a stand mixer fitted with the paddle attachment, beat the softened cream cheese, powdered sugar, and vanilla until smooth and creamy. Scrape down the bowl.
-
Whip the Cream: Switch to the whisk attachment (or use a separate bowl and hand mixer) and slowly stream in the cold heavy cream. Whip until the mixture is light, fluffy, and holds medium-stiff peaks.
-
Fold in Strawberry: Gently fold in the strawberry jam/compote (and optional freeze-dried powder) until just combined, creating a slight swirl effect. Do not overmix. Refrigerate the filling for at least 30 minutes to firm up.
-
Stuff the Doughnuts: Transfer the chilled filling to a piping bag fitted with a long, plain bismarck or round tip. Use a small, sharp knife or skewer to poke a deep hole into the side of each cooled doughnut. Insert the tip into the hole and pipe the filling until the doughnut feels heavy and slightly expands.
-
Serve: Garnish immediately with fresh sliced strawberries or a dusting of powdered sugar.
The Art of the Doughnut: Crafting the Perfect Yeast-Raised Base
The signature characteristic of a truly exceptional stuffed donut is the yeast-raised dough. Unlike dense, cake-style varieties, yeast-raised donuts, particularly those based on a rich brioche formula, yield a light, airy crumb that provides the ideal contrast to the heavy, creamy filling.
The Science of Enriched Dough
The dough for a high-quality filled donut is an enriched dough—meaning it contains a high percentage of butter, eggs, and dairy (milk or cream), in addition to the standard flour, water, yeast, and sugar. These additions serve specific purposes:
-
Egg Yolks: Provide lecithin, a natural emulsifier, and fat, which interfere with gluten development, resulting in a tender, softer crumb that stays fresh longer. Using only yolks, as many professional recipes suggest, maximizes richness and color without adding the structure provided by egg whites.
-
Butter and Milk: The high fat content further tenderizes the dough, giving it that characteristic “pillowy” texture. This rich composition ensures the dough remains moist even after deep frying, counteracting the drying effects of heat.
-
Proofing Precision: The secret to the airy texture lies in the double rise, or proofing process. The initial rise (bulk fermentation) allows the yeast to develop flavor and the gluten structure to strengthen. The second, shorter rise after shaping is critical; this is where the dough balls inflate with CO2, creating the internal air pockets necessary for a light, cloud-like finish. When proofing, always aim for a warm, draft-free environment (75°F–85°F / 24°C–29°C is ideal).
Frying Fundamentals: The Non-Greasy Donut
The difference between a delightful donut and a heavy, oil-soaked one almost always comes down to the temperature of the frying oil.
Temperature Control is Paramount:
-
Optimal Range (350°F–375°F / 175°C–190°C): This window is crucial. Oil that is too cool allows the dough to absorb excess fat before the surface has time to set, resulting in a greasy product. Oil that is too hot will brown the exterior quickly, leaving the center raw and dense. Constant monitoring with a reliable thermometer is non-negotiable.
-
Batch Size: Never overcrowd the pot. When doughnuts are added, the oil temperature inevitably drops. Frying in small batches (3 or 4 at a time) ensures the heat recovers quickly and stays consistent.
-
Parchment Paper Hack: Transferring soft, proofed dough balls into hot oil can deflate them. To avoid this, proof the doughnuts on individual squares of parchment paper. When ready to fry, drop the entire square—dough and paper—into the oil. After a few seconds, the parchment will release and can be removed with tongs, leaving the fully-proofed dough intact and ready to fry.
Immediately after frying, placing the doughnuts on a wire rack lined with paper towels helps drain any remaining surface oil, paving the way for a clean, sweet sugar coating.
Mastering the Stuffing: The Strawberry Cheesecake Symphony
While the dough provides the canvas, the cheesecake filling is the true spectacle of this dessert. It requires balancing the necessary richness of a classic cheesecake with the light, pipeable consistency needed for a stuffed pastry.
The Cheesecake Filling Structure
The perfect filling strikes a balance between dense creaminess and airy lift. Traditional cheesecake is typically too dense for piping, so the inclusion of heavy cream is the key modification:
-
The Cream Cheese Base: Start with softened, full-fat cream cheese. It must be at room temperature to ensure it creams smoothly with the powdered sugar, preventing lumps. Powdered sugar is preferred over granulated sugar for its superior ability to dissolve completely, guaranteeing a silky texture.
-
The Aeration Agent: Cold heavy cream is incorporated and whipped (either separately or directly into the cream cheese mixture) until soft peaks form. This step creates a stabilized “cheesecake mousse” or whipped cream cheese filling that is light, holds its shape for piping, and provides a delightful mouthfeel that melts on the tongue.
Strawberry Component: Jam, Compote, or Roast
The strawberry flavor can be introduced in several ways, each impacting the texture and intensity of the filling:
-
Store-Bought Jam (The Easiest): For simplicity, a high-quality strawberry jam or preserve can be folded directly into the cream cheese mixture. This yields a smooth, uniform filling.
-
Homemade Compote/Sauce: Simmering fresh or frozen strawberries with sugar and a touch of water until softened, then cooling, creates a vibrant, concentrated strawberry flavor that can be folded in or even injected as a separate layer.
-
Roasted Strawberries (The Deepest Flavor): Roasting strawberries with a little sugar concentrates their natural sugars and intensifies their flavor dramatically, adding a rich, jammy depth far beyond simple cooking. Ensure the roasted berries and any resulting syrup are chilled completely before folding into the cream mixture to prevent the cream from collapsing.
For a visually appealing result, incorporate the strawberry component last, folding it in gently just until streaks of red/pink marble through the white cream base. This technique is often more visually engaging than a uniformly colored filling.
Piping for Perfect Filling
The technique for filling is straightforward but requires the right tools:
-
Bismarck Tip: Named after the German filled doughnut (Berliner/Bismarcken), this long, slender piping tip is designed specifically for injecting fillings. It minimizes the size of the hole required while ensuring the filling reaches the center of the donut.
-
The Cavity Creation: Before filling, use a small, sharp knife or a skewer to poke a hole into the side of the cooled donut. Gently wiggle the tool to create a small internal cavity without damaging the exterior structure.
-
Filling Until Plump: Insert the piping tip fully, then steadily squeeze the piping bag. The key indicator that the donut is fully stuffed is a slight expansion of the dough and a small amount of filling beginning to ooze back out of the injection hole. This guarantees a generous filling ratio, which is essential for the cheesecake experience.
Frying vs. Baking: Achieving the Ideal Texture
While the deep-fried, yeast-raised donut is the classic vehicle for this recipe, modern techniques offer excellent alternatives, particularly for those seeking less mess or a slightly different texture profile. Understanding the trade-offs is key to choosing the right method for your kitchen.
The Case for Traditional Frying
Frying produces a uniquely superior product for a stuffed donut due to a phenomenon called spring, or rapid oven lift. The intense, immediate heat of the oil causes the yeast cells to activate dramatically and the moisture inside the dough to flash into steam, resulting in a magnificent internal structure and the signature ‘white ring’ around the donut’s middle. This creates the light, hollowed-out interior perfect for accepting a rich filling.
The Baked Alternative
For a lighter, less caloric option, the cake donut base, often made with chemical leaveners like baking powder and soda, can be baked in a specialized donut pan.
-
Quick Preparation: Baked cake donuts require no yeast or proofing time, drastically cutting the overall preparation time.
-
Moisture Retention: Some baked recipes incorporate ingredients like buttermilk, sour cream, or even a small amount of mayonnaise (which is mostly oil and egg) to increase moisture and tenderness, preventing the baked dough from drying out.
-
Assembly Difference: Since baked donuts are typically ring-shaped, they are often cut in half and layered with the cheesecake filling, turning them into a donut sandwich or a mini-strawberry shortcake variation, rather than being truly “stuffed.” If baking yeast-raised dough (a possibility), the bake time is longer (around 10-12 minutes at 375°F / 190°C), and the final texture will be less airy than a fried one.
In summary, for the authentic, pillow-soft, traditionally stuffed experience, deep frying is the method of choice. For speed and ease, a baked donut hole or sandwich style can achieve the same flavor profile.
Elevating the Experience: Coatings, Pairings, and Storage
A completed Strawberry Cheesecake Stuffed Donut is an achievement, but the final touches and thoughtful presentation can elevate it from a homemade treat to a bakery-quality showstopper.
Beyond Granulated Sugar: Specialty Coatings
While rolling the warm donuts in granulated sugar is classic, customized coatings add complexity and visual appeal:
-
Strawberry Sugar: Grind freeze-dried strawberries with granulated or powdered sugar in a food processor. This creates an intensely fragrant, naturally pink coating that reinforces the strawberry flavor.
-
Cinnamon Sugar: For a warmth that complements the “graham cracker” crust element of the cheesecake, a simple blend of ground cinnamon and granulated sugar works wonderfully.
-
Lemon Glaze: A thin, quick-setting glaze made from powdered sugar, milk, and a generous squeeze of fresh lemon juice adds a refreshing acidity that cuts through the richness of the filling.
-
Graham Cracker Crumble: For baked varieties or as a topping for a glaze, mixing finely crushed graham crackers with a bit of melted butter and sugar and sprinkling it over the finished donut mimics the base of a classic cheesecake.
Flavor and Serving Variations
The strawberry cheesecake concept is highly adaptable to subtle flavor shifts:
-
Citrus Brightness: Incorporate lemon zest into the doughnut dough or the cheesecake filling for a brighter, more pronounced lift.
-
Floral Notes: As seen in some gourmet preparations, infusing the granulated sugar coating with culinary lavender adds a subtle, fragrant elegance.
-
Swap the Berry: The recipe translates beautifully when substituting other fruits. Try raspberry or blueberry preserves, or use roasted peaches during the summer months.
-
The Mascarpone Difference: Replacing some or all of the cream cheese with cold mascarpone cheese yields an even silkier, richer filling with a less sharp tang, appealing to those who prefer a dessert-forward cream.
-
Presentation: Always garnish just before serving. A small dollop of leftover strawberry compote on top, a fresh strawberry fan, or a light dusting of powdered sugar adds professional finesse.
Proper Storage and Shelf Life
Due to the presence of cream cheese and heavy cream, these donuts must be treated like a pastry and refrigerated.
-
Refrigeration: Store any filled leftovers in an airtight container in the refrigerator for up to 2 days.
-
Optimal Freshness: Like all fried dough, the donuts are best enjoyed within 4 to 6 hours of being filled. If preparing ahead, the best practice is to fry and sugar-coat the donuts, store the cooled shells at room temperature, and keep the cheesecake filling refrigerated separately. Assemble and fill the donuts within an hour of serving time to ensure the freshest texture.
-
Reheating (Optional): If the refrigerated donuts seem slightly dense the next day, a brief 10–15 second warm-up in the microwave can restore some of the dough’s softness, but extreme caution must be used, as overheating will cause the internal cheesecake filling to melt and ooze.