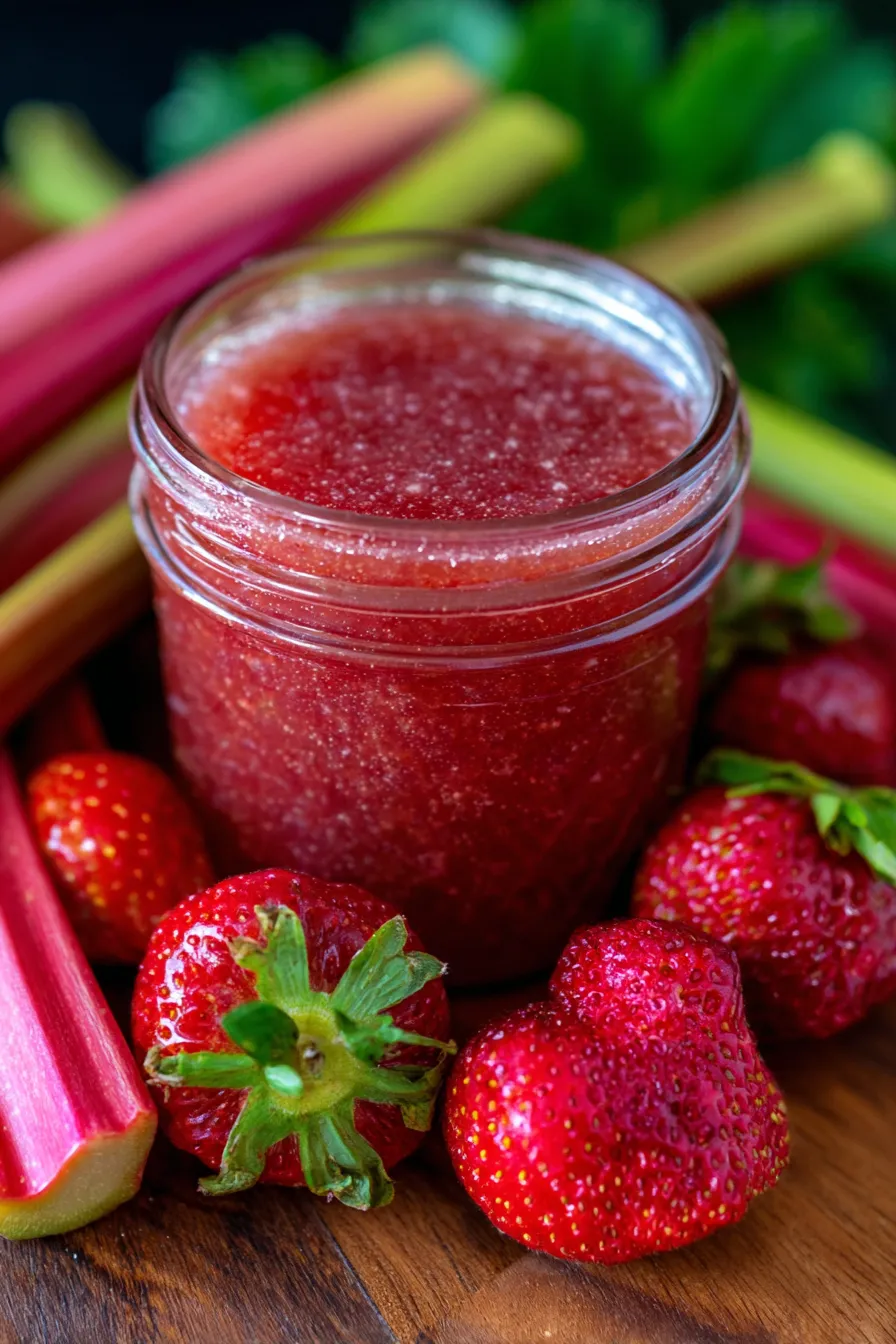
Homemade Strawberry Rhubarb Jam: A Taste of Spring in Every Jar!
There’s something incredibly magical about the arrival of spring. For me, it always brings back cherished memories of my grandmother’s garden, bursting with life. I can still picture her, sun-kissed and smiling, harvesting the first tender stalks of rhubarb while I’d trail behind, popping the sweetest, ripest strawberries straight into my mouth. Those were the days when “homemade” wasn’t just a trend; it was a way of life, and the kitchen always smelled of pure joy.
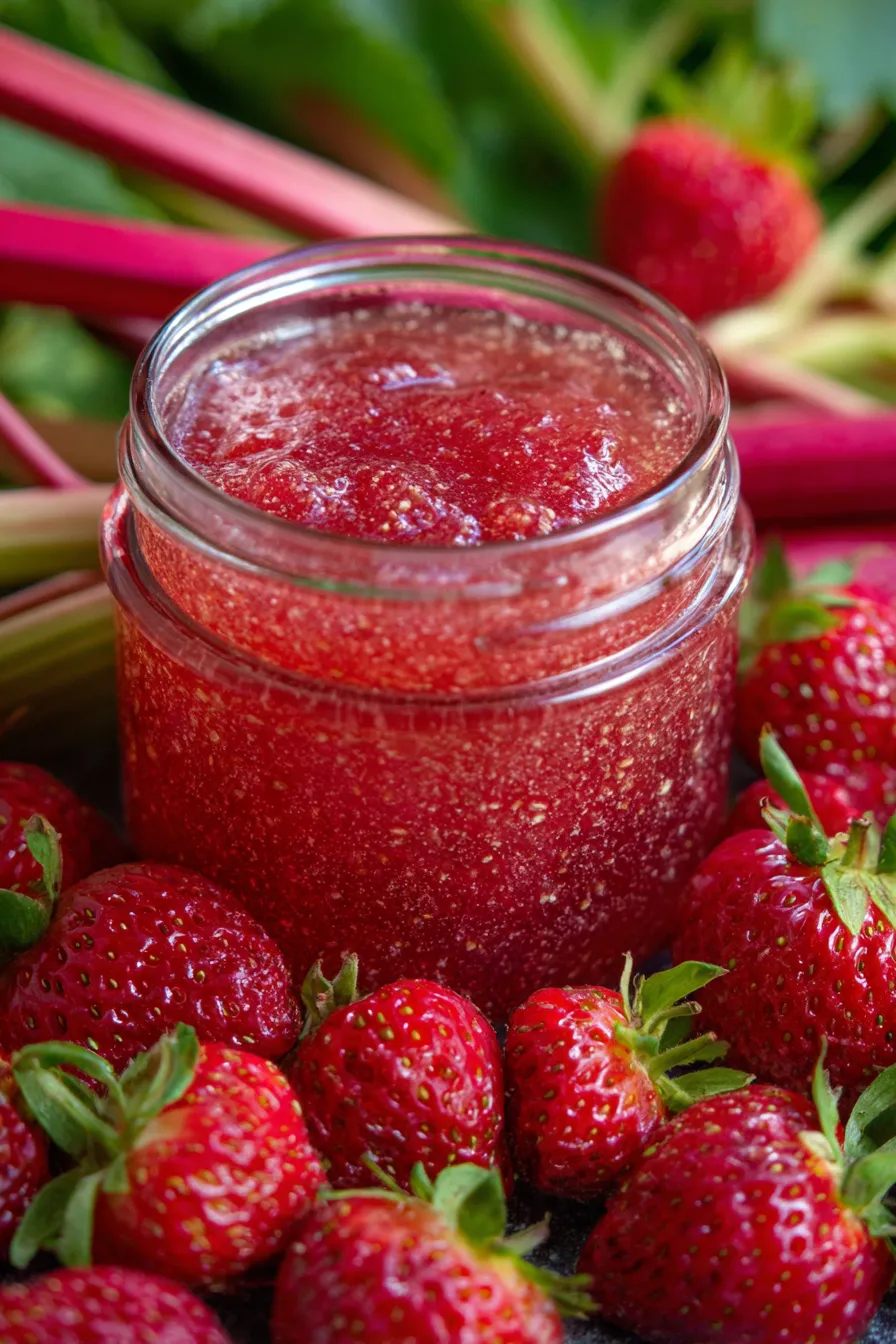
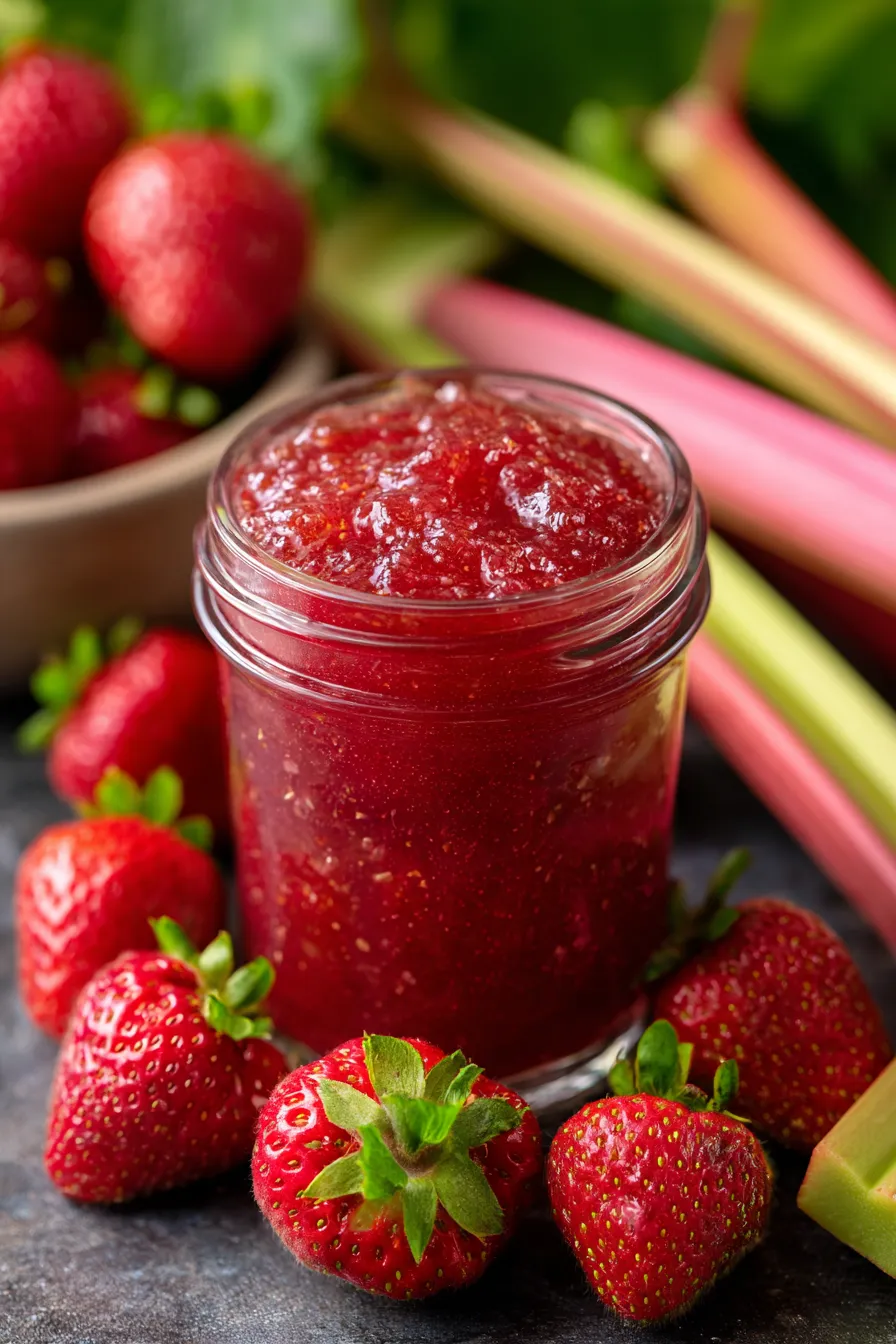
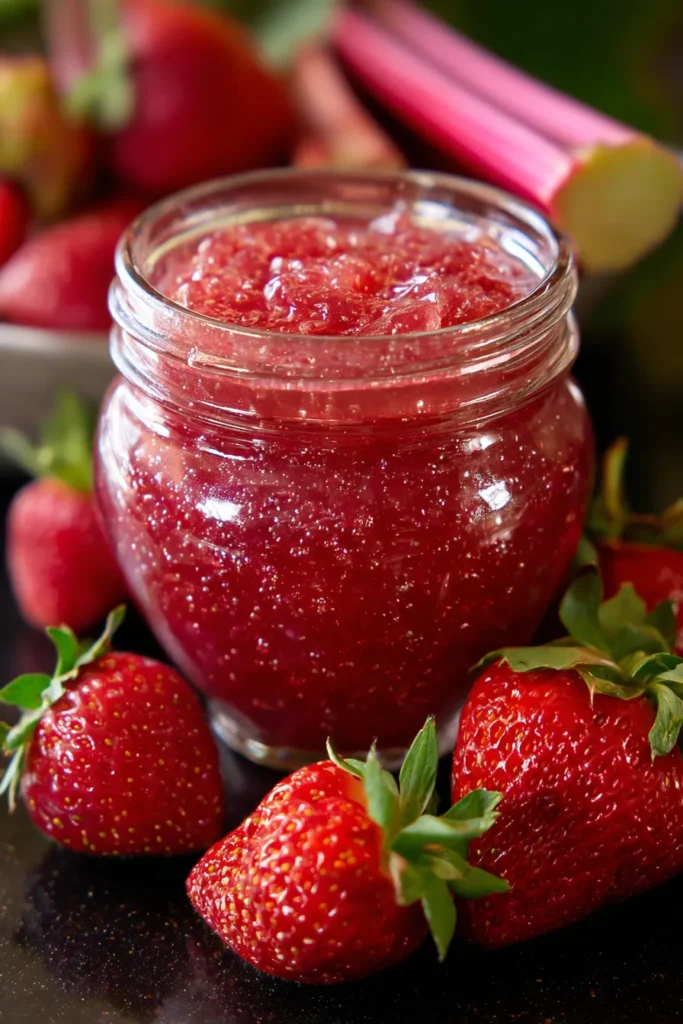
That feeling of warmth and home is exactly what this incredible **strawberry rhubarb jam** recipe evokes. It’s more than just a spread; it’s a spoonful of nostalgia, a vibrant burst of seasonal flavor, and a true testament to simple, wholesome ingredients. This classic, tried-and-true recipe, passed down through generations, ensures you can capture that fleeting springtime sweetness to enjoy all year long. Forget store-bought; once you taste this easy canning project, you’ll never go back!
We’ve perfected this family-favorite recipe over countless batches, testing every nuance to bring you a truly foolproof method for the most delicious, naturally sweet, and perfectly tart jam. Get ready to transform fresh fruit into a shimmering, jewel-toned delight that will elevate your breakfast toast, afternoon scones, and even your dessert creations. It’s a wonderful way to enjoy the best of seasonal fruit, creating homemade treats that taste like pure sunshine.
Why You’ll Love This Recipe
❤️ Here’s why this strawberry rhubarb jam will quickly become a cherished favorite in your kitchen:
- A Perfect Harmony of Flavors: The natural sweetness of ripe strawberries beautifully balances the delightful tang of fresh rhubarb. It’s a classic combination that’s incredibly vibrant, creating a complex yet comforting flavor profile that awakens the taste buds with every spoonful.
- Brilliant, Jewel-Toned Color: This jam boasts an absolutely stunning, ruby-red hue, flecked with tender pieces of fruit. It looks as incredible as it tastes, making it a gorgeous addition to any breakfast table, hostess gift basket, or afternoon tea spread.
- Surprisingly Simple to Make: Don’t be intimidated by homemade jam! While it feels wonderfully gourmet, the process is straightforward and incredibly rewarding. With just a few basic ingredients and some patience, you’ll be canning like a pro in no time, even if you’re a beginner.
- Incredible Versatility: This isn’t just for toast! Spread it on warm biscuits, swirl it into yogurt or oatmeal, spoon it over ice cream, use it as a filling for tarts or cakes, or even pair it with cheese on a charcuterie board. The possibilities are endless, and it instantly elevates any dish.
- Preserve the Taste of Spring: Rhubarb’s season is fleeting, and strawberries are at their peak for a limited time. Making this jam is the absolute best way to capture those peak-season flavors, allowing you to enjoy the fresh taste of spring and early summer long after the harvest has passed.
- Wonderful Homemade Gift: Jars of homemade jam are thoughtful, personalized gifts that truly show you care. Package them with a pretty ribbon and a handwritten tag for birthdays, holidays, or just because. Everyone appreciates a delicious, handcrafted treat!
- No Artificial Additives: When you make jam at home, you control every ingredient. This recipe uses simple, natural components – fruit, sugar, and lemon juice – meaning no high-fructose corn syrup, artificial colors, or preservatives. Just pure, wholesome goodness.
- Customizable to Your Liking: While this recipe is perfect as is, it also offers fantastic flexibility. You can adjust the sweetness, add a hint of spice like vanilla or ginger, or even incorporate other berries to make it truly your own.
What You Need
You only need a few simple, fresh ingredients to bring this vibrant jam to life! The beauty of this recipe lies in its simplicity, letting the natural flavors of the fruit truly shine. Check the full printable recipe card below for detailed measurements and any optional additions.
Expert Tips for Perfect Jam Every Time
💡 Achieving jam perfection is easier than you think with these professional insights:
- Choose Peak-Season Fruit: The quality of your jam starts with your ingredients. Select bright red, firm, ripe strawberries (not overripe or bruised) and crisp, pink-to-red rhubarb stalks. The fresher your fruit, the more vibrant and flavorful your jam will be. Avoid green rhubarb as it can be overly tart.
- Prepare Your Fruit Properly: Wash and hull your strawberries, then slice or dice them into uniform pieces. For rhubarb, trim the ends and chop into ½-inch pieces. Consistency in size helps ensure even cooking and a beautiful texture throughout the jam.
- Don’t Skimp on the Lemon Juice: Lemon juice isn’t just for flavor; it’s crucial for jam setting! The acid in lemon juice helps activate the natural pectin in the fruit, which is essential for achieving that perfect jam consistency. It also brightens the flavors and acts as a natural preservative.
- Use a Large, Heavy-Bottomed Pot: A wide, shallow pot (like a Dutch oven or a jam pot) is ideal. The wide surface area allows for quicker evaporation, which helps the jam thicken faster and reduces cooking time, preserving the fresh fruit flavor. A heavy bottom prevents scorching.
- Stir, Stir, Stir: Especially once the jam starts to thicken, consistent stirring is key to prevent it from sticking to the bottom of the pot and burning. Use a heat-proof rubber spatula or wooden spoon to scrape the bottom and sides frequently.
- Test for Doneness – The Cold Plate Method: This is a foolproof way to check if your jam has set. Place a small plate in the freezer before you start cooking. When you think the jam is ready, spoon a small amount onto the cold plate, wait 30 seconds, then push it with your finger. If it wrinkles, it’s ready!
- Sterilize Your Jars and Lids: For shelf-stable jam, proper sterilization is non-negotiable. Wash jars and lids in hot, soapy water, rinse thoroughly, then sterilize in boiling water or a dishwasher on a hot cycle. Keep them hot until filling.
- Leave Headspace: When filling your hot, sterilized jars, leave about ¼ inch of headspace from the rim. This is crucial for creating a proper vacuum seal during canning. Too little headspace can cause the lid to buckle; too much can prevent a strong seal.
- Process Jars Properly: If you’re planning to store your jam at room temperature, water bath canning is essential. Follow a reliable canning guide for processing times based on your altitude. This ensures food safety and extends shelf life significantly.
- Patience is a Virtue: Jam needs time to fully set after it’s been jarred. Resist the urge to open a jar immediately! Let the jam rest undisturbed for 24-48 hours in a cool, dark place to allow it to reach its optimal consistency.
- Clean as You Go: Jam making can be a bit messy. Have a damp cloth handy to wipe down the rims of your jars before applying lids, ensuring a clean sealing surface.
Variations & Substitutions
While the classic strawberry rhubarb jam is pure perfection, don’t hesitate to experiment and make it your own!
- Spice It Up: Add a teaspoon of vanilla extract at the end of cooking for a warm, aromatic note. A pinch of ground ginger or cardamom can also add a delightful complexity. A few strips of orange zest simmered with the fruit and removed before jarring will infuse a lovely citrus brightness.
- Low-Sugar Option: If you prefer less sweetness, consider using a low-sugar or no-sugar-needed pectin. These pectins are formulated to set jam with significantly reduced sugar, allowing the fruit’s natural flavors to truly shine. Always follow the specific instructions on the pectin package.
- Honey or Maple Sweetened: For a more natural sweetener, you can substitute some of the granulated sugar with honey or maple syrup. Keep in mind that these natural sweeteners can affect the texture and may require adjustments to cooking time or the addition of extra pectin to achieve a firm set.
- Berry Boost: Enhance the berry flavor by adding a handful of raspberries or blackberries along with the strawberries and rhubarb. This creates a multi-berry blend that’s equally delicious.
- Herbal Infusion: For an adventurous twist, infuse a sprig of fresh thyme or rosemary during the last few minutes of cooking, then remove it before jarring. This adds an unexpected, sophisticated herbaceous note.
Storage & Freezing
Proper storage is key to enjoying your homemade strawberry rhubarb jam for months to come!
- Canned/Shelf-Stable: If you’ve properly processed your jam using the water bath canning method and achieved a good seal, jars can be stored in a cool, dark pantry for up to 1 year. Once opened, refrigerate and consume within 2-3 weeks.
- Refrigerator Storage: If you opt not to can your jam, or if a jar doesn’t seal, simply store it in the refrigerator. It will keep well for about 2-3 weeks.
- Freezing: For longer storage without canning, you can freeze your jam! Ladle cooled jam into freezer-safe containers or plastic freezer bags, leaving plenty of headspace for expansion. It will last in the freezer for up to 6 months. Thaw in the refrigerator before using.
FAQ
Q: What kind of rhubarb should I use?
A: Look for fresh, firm, and crisp rhubarb stalks. While often associated with a vibrant red color, some varieties are greener but still perfectly good for jam. Prioritize freshness and firmness over color. Avoid any stalks that are soft, withered, or discolored.
Q: Do I need to add pectin to this jam?
A: This recipe is often successful without added commercial pectin because both strawberries and rhubarb contain natural pectin, especially if they’re not overly ripe. The lemon juice also aids in pectin activation. However, if you prefer a very firm set or are concerned about your jam not setting, you can certainly add a package of liquid or powdered pectin according to its package directions. Adjust the sugar level if using a low-sugar pectin.
Q: How do I know when the jam is set and ready?
A: The most reliable method is the “cold plate test” described in the Expert Tips section. Alternatively, you can use a candy thermometer: jam is typically set when it reaches 220°F (104°C) at sea level. Another visual cue is the “sheeting test” – dip a cold spoon into the jam, lift it, and tilt it sideways. If the jam forms a sheet or drips off in flakes rather than individual drops, it’s likely ready.
Q: Can I reduce the amount of sugar in the recipe?
A: Sugar plays a crucial role not just in sweetness but also in preserving the jam and aiding in its set. While you can make slight reductions (e.g., 10-15%), significant reductions without specialized low-sugar pectin will likely result in a softer set or a jam that needs to be refrigerated or frozen for longer storage. Always use a proper canning recipe if significantly altering sugar for shelf stability.
There you have it – the ultimate guide to creating the most delectable **strawberry rhubarb jam** right in your own kitchen! This recipe is more than just ingredients and steps; it’s a connection to tradition, a celebration of seasons, and a delicious way to bring joy to your table. We hope you love making and sharing this vibrant spread as much as we do.
If you make this recipe, be sure to tag us on social media! And don’t forget to Pin this recipe for later so you can revisit that taste of spring whenever you need a little sunshine.
Homemade Strawberry Rhubarb Jam Recipe | Sweet & Tart Perfection
Ingredients
- 4 cups fresh strawberries, hulled and chopped
- 4 cups fresh rhubarb, trimmed and chopped (about 1 lb)
- 4 cups granulated sugar
- 1/4 cup fresh lemon juice
Instructions
- Step 1 Combine strawberries, rhubarb, and sugar in a large, heavy-bottomed pot. Let sit for 30 minutes to an hour to draw out juices.
- Step 2 Add lemon juice to the pot.
- Step 3 Bring mixture to a rolling boil over medium-high heat, stirring constantly to prevent scorching.
- Step 4 Continue to boil, stirring frequently, until the jam reaches its setting point (220°F / 104°C on a candy thermometer, or passes the cold plate test). This usually takes 15-25 minutes.
- Step 5 Carefully ladle hot jam into hot, sterilized jars, leaving 1/4 inch headspace.
- Step 6 Wipe rims, apply lids and bands. Process in a boiling water canner for 10 minutes (adjust for altitude).
- Step 7 Remove jars from canner and let cool on a wire rack for 24 hours. Check seals, then store.