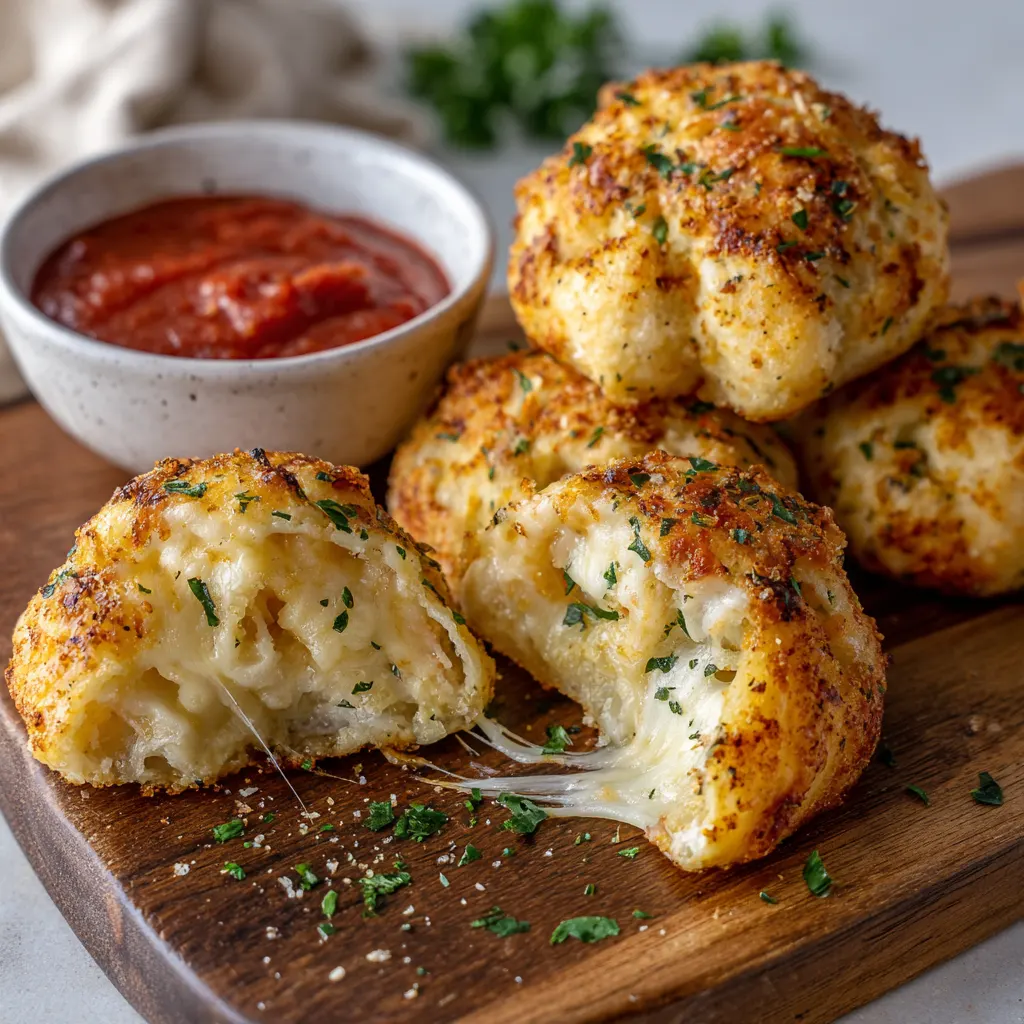
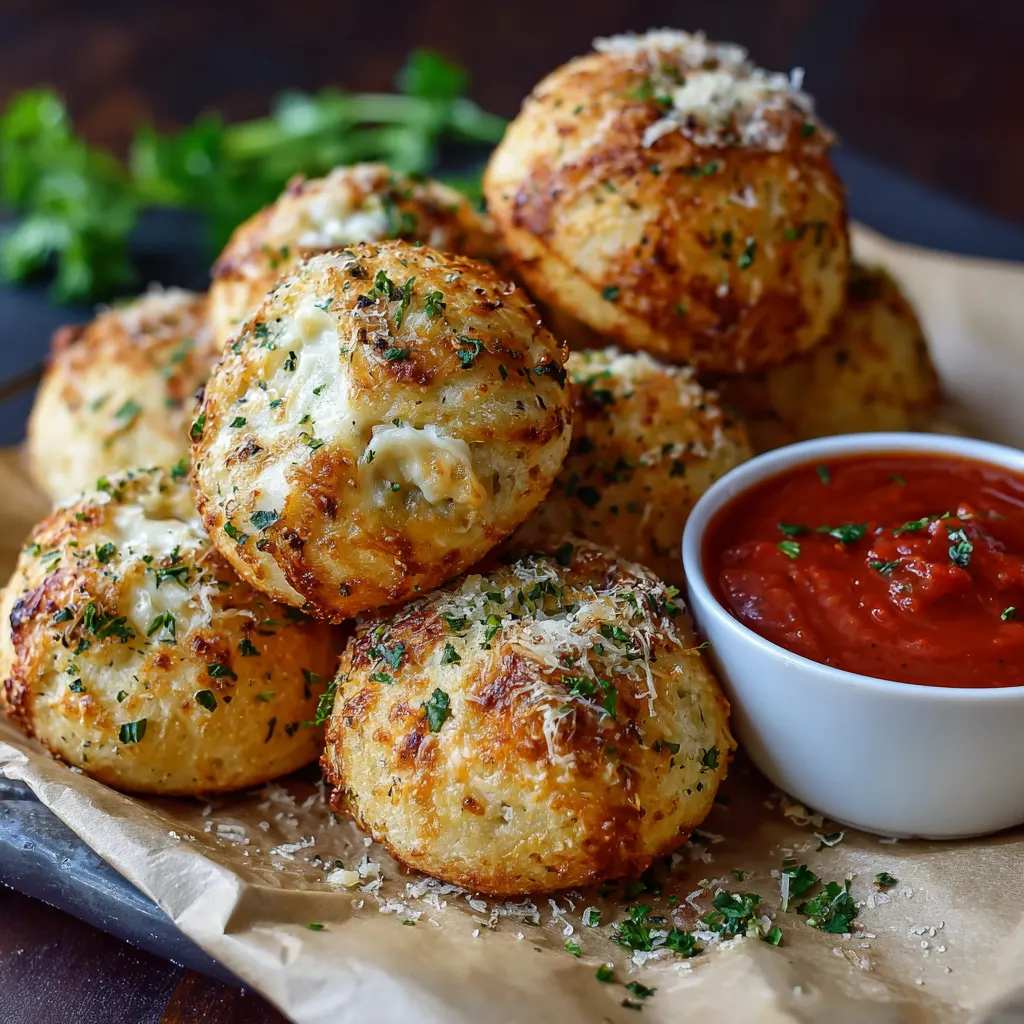
Cheesy Garlic Parmesan Pizza Bombs are the ultimate handheld appetizer, snack, or fun side dish, combining the satisfying chew of fresh pizza dough with a bursting core of gooey cheese and savory fillings, all coated in a rich, herby garlic butter glaze. Whether you’re preparing for a game day party, seeking an easy weeknight meal addition, or just craving a delicious twist on classic pizza, these “bombs” offer maximum flavor for minimal effort. The key to their irresistibility lies in the balance between the zesty internal filling and the crispy, golden-brown exterior dusted with aromatic Parmesan cheese.
Ingredients
For the Pizza Bombs:
-
1 (13.8 oz) can refrigerated pizza dough (or 1 pound store-bought or homemade pizza dough)
-
6 oz mozzarella cheese, cut into 12 equal cubes (about ¾-inch size)
-
⅓ cup pizza sauce or marinara sauce
-
36 slices mini pepperoni, or other desired fillings (optional)
-
All-purpose flour, for dusting
For the Garlic Parmesan Glaze:
-
4 Tbsp unsalted butter, melted
-
2–3 cloves garlic, minced, or 1 tsp garlic powder/garlic salt
-
½ tsp Italian seasoning
-
¼ cup grated Parmesan cheese (freshly grated preferred)
-
1 Tbsp fresh parsley, finely chopped (optional, for garnish)
For Serving:
-
Warmed marinara sauce, ranch dressing, or extra pizza sauce for dipping
Instructions (Step-by-Step)
-
Preparation and Preheat: Preheat your oven to 400°F (200°C). Lightly spray a 12-count muffin tin or line a baking sheet with parchment paper. If using refrigerated pizza dough, roll it out onto a lightly floured surface into a large rectangle (approximately 10×15 inches).
-
Cut the Dough: Use a pizza cutter or sharp knife to divide the dough into 12 equal squares. If using refrigerated biscuit dough, flatten each biscuit slightly to about ⅛-inch thickness.
-
Fill the Bombs: Place one dough square on your work surface. Spoon about 1 teaspoon of pizza sauce onto the center, avoiding the edges. Top the sauce with 3 pepperoni slices and one cube of mozzarella cheese. Pro Tip: Using cheese cubes ensures a more consistent, gooey center than shredded cheese.
-
Seal and Shape: Gently pull the edges of the dough up and around the filling. Pinch the seams together tightly at the top to securely seal the ingredients inside, ensuring there are no holes or gaps. Roll the dough briefly in your palms to form a smooth, compact ball.
-
Arrange and Glaze (Pre-Bake): Place the sealed dough balls seam-side down into the prepared muffin tin or on the baking sheet, spacing them slightly apart.
-
Make the Glaze: In a small bowl, whisk together the melted butter, minced garlic, and Italian seasoning. Brush about two-thirds of this mixture evenly over the tops and sides of the assembled pizza bombs.
-
Bake: Bake for 15–20 minutes (18–22 minutes if using canned biscuits) or until the bombs are puffed up and golden brown. Baking time may vary depending on the dough type and thickness.
-
Final Seasoning: Immediately after removing the bombs from the oven, brush them generously with the remaining garlic butter mixture. Sprinkle them heavily with the grated Parmesan cheese and chopped parsley (if using).
-
Serve: Let them cool for 5 minutes before serving warm with marinara sauce for dipping.
Mastering the Dough and Assembly for Perfect Pockets
The foundation of a perfect pizza bomb is the dough, and choosing the right type and handling it correctly is crucial for achieving that desirable light, yet chewy, texture. While homemade pizza dough offers the best flavor and texture control, many popular recipes utilize convenient alternatives.
Dough Selection and Preparation:
-
Refrigerated Pizza Dough: This is the most common and easiest option, offering a reliably chewy result. Simply unroll and cut into squares.
-
Refrigerated Biscuit Dough (Buttermilk): This provides a flakier, breadier texture compared to standard pizza dough. It’s often thicker, requiring a light flattening with a rolling pin or by hand before stuffing to ensure the filling-to-bread ratio is balanced. Note that biscuits generally require a slightly longer cook time than thin-cut pizza dough squares.
-
Homemade Pizza Dough: If using homemade dough, ensure it has proofed sufficiently (about 1-2 hours) and is brought to room temperature before rolling and cutting.
Critical Sealing Techniques:
The main challenge in assembly is preventing the filling from bursting out during baking, which creates a messy, cheesy crust on the tray.
-
Start with Cubed Cheese: Using a solid cube of mozzarella (rather than shredded) minimizes the chance of leakage. As the cube melts, it tends to hold its shape longer before becoming fully liquid.
-
The Tight Pinch: When folding the dough around the filling, gather the edges towards the center and pinch the seams very tightly to ensure a complete seal. A common pro tip is to lightly moisten your fingertips with water before sealing—this acts as an adhesive, helping the dough stick together securely.
-
Seam-Side Down: Always place the assembled bombs seam-side down in the muffin tin or on the baking sheet. This ensures the seam is held shut by gravity and the weight of the ball, further securing the filling.
The Secret is in the Glaze: Achieving the Signature Garlic Parmesan Crust
The element that truly elevates these appetizers from simple cheese rolls to “Pizza Bombs” is the intensely flavorful Garlic Parmesan Glaze. This coating provides the signature aromatic crust and a punch of savory flavor that complements the internal pizza filling.
The Anatomy of the Glaze:
The essential components are fat, aromatic, herb, and salt.
-
The Base (Butter): Use melted unsalted butter. It carries the flavor and helps the exterior brown beautifully.
-
The Aromatic (Garlic): Use fresh minced garlic for the strongest flavor. However, a high-quality garlic powder or garlic salt is a common substitution that integrates more smoothly into the glaze. If using fresh garlic, be mindful of burning; mixing it with the butter and baking it briefly helps it toast rather than scorch.
-
The Herbs (Italian Seasoning/Parsley): Italian seasoning (a mix of oregano, basil, rosemary, and thyme) is essential for that classic pizza aroma. Fresh parsley, while optional, adds a vibrant green visual contrast and a fresh counterpoint to the richness.
-
The Finisher (Parmesan): The final dusting of grated Parmesan cheese is crucial. For the best result, use freshly grated Parmesan, which melts slightly upon contact with the hot butter, forming a savory, slightly crusty layer.
Optimal Glazing Strategy:
For maximum flavor and texture, the best practice is to glaze the bombs in two stages:
-
Pre-Bake Glaze: Brush the majority (about ⅔) of the garlic butter onto the dough balls before they enter the oven. This infusion ensures the butter and herbs soak into the crust as it bakes, contributing to a rich, golden color.
-
Post-Bake Finish: Immediately after removing the hot bombs from the oven, brush them with the remaining garlic butter and liberally sprinkle the grated Parmesan cheese and parsley on top. The residual heat and melted butter help the cheese adhere, resulting in that iconic, savory crust.
Customization and Flavor Variations for Endless Options
While the classic Cheesy Garlic Parmesan Pizza Bomb is typically stuffed with mozzarella and pepperoni, the recipe serves as an excellent canvas for creative substitutions and flavor experimentation, making them adaptable for nearly any dietary preference or craving.
Internal Filling Swaps (Savory & Meat):
-
Meat Lovers: Substitute pepperoni with pre-cooked crumbled Italian sausage, diced cooked bacon, or small pieces of cubed cooked ham.
-
Cheeseburger Twist: Incorporate seasoned ground beef mixed with a pinch of cheddar cheese for a “cheeseburger bomb,” often topped with a sprinkle of sesame seeds before baking.
-
Spicy Kick: Add diced jalapeños, a dash of red pepper flakes to the pizza sauce, or substitute mozzarella with pepper jack cheese.
Vegetarian and Vegan Options:
-
Classic Veggie: Include finely diced bell peppers, mushrooms, onions, or black olives alongside the cheese and sauce. Ensure vegetables are finely diced and moisture-free to avoid making the dough soggy.
-
Pesto Swap: Substitute the traditional pizza sauce inside the bomb with a spoonful of vibrant basil pesto for a fresher, nuttier flavor profile.
-
Garlic Cheese Only: For purists, simply stuff the dough with mozzarella or a blend of provolone and mozzarella, omitting the sauce and maximizing the garlic butter flavor.
Serving, Storing
Ensuring your pizza bombs are perfectly baked and safely stored guarantees a superior snacking experience. Attention to detail in the final stages of cooking and handling can make the difference between a golden, gooey appetizer and a doughy disappointment.
Baking Tips for the Ideal Texture:
-
Heat is Key: A high oven temperature (400°F/200°C) is necessary to ensure the dough cooks quickly and browns on the outside before the cheese has completely liquefied and potentially burst out.
-
Use the Right Pan: While a baking sheet works, a muffin tin provides superior structural support, helping the dough balls rise upward and maintain their spherical shape, resulting in a more uniform presentation.
-
Air Fryer Option: For a faster, crispier result, preheat an air fryer to 350°F (175°C). Place the assembled bombs in a single layer and cook for 10–12 minutes, or until golden brown.
Make-Ahead and Storage Guidance:
These bombs are an excellent make-ahead option, perfect for stress-free party preparation.
-
Make-Ahead (Unbaked): Assemble the pizza bombs completely (including the pre-bake glaze), cover them tightly with plastic wrap, and refrigerate for up to 24 hours. When ready to bake, remove them from the refrigerator while the oven preheats and add a few extra minutes to the baking time to compensate for the cold dough.
-
Storage (Leftovers): Allow baked and cooled leftovers to be stored in an airtight container in the refrigerator for up to three days.
-
Freezing: For longer storage, freeze the unbaked bombs by placing them on a baking sheet until solid (1–2 hours), then transfer them to a freezer-safe bag. Bake them from frozen, adding 5–10 minutes to the cook time.