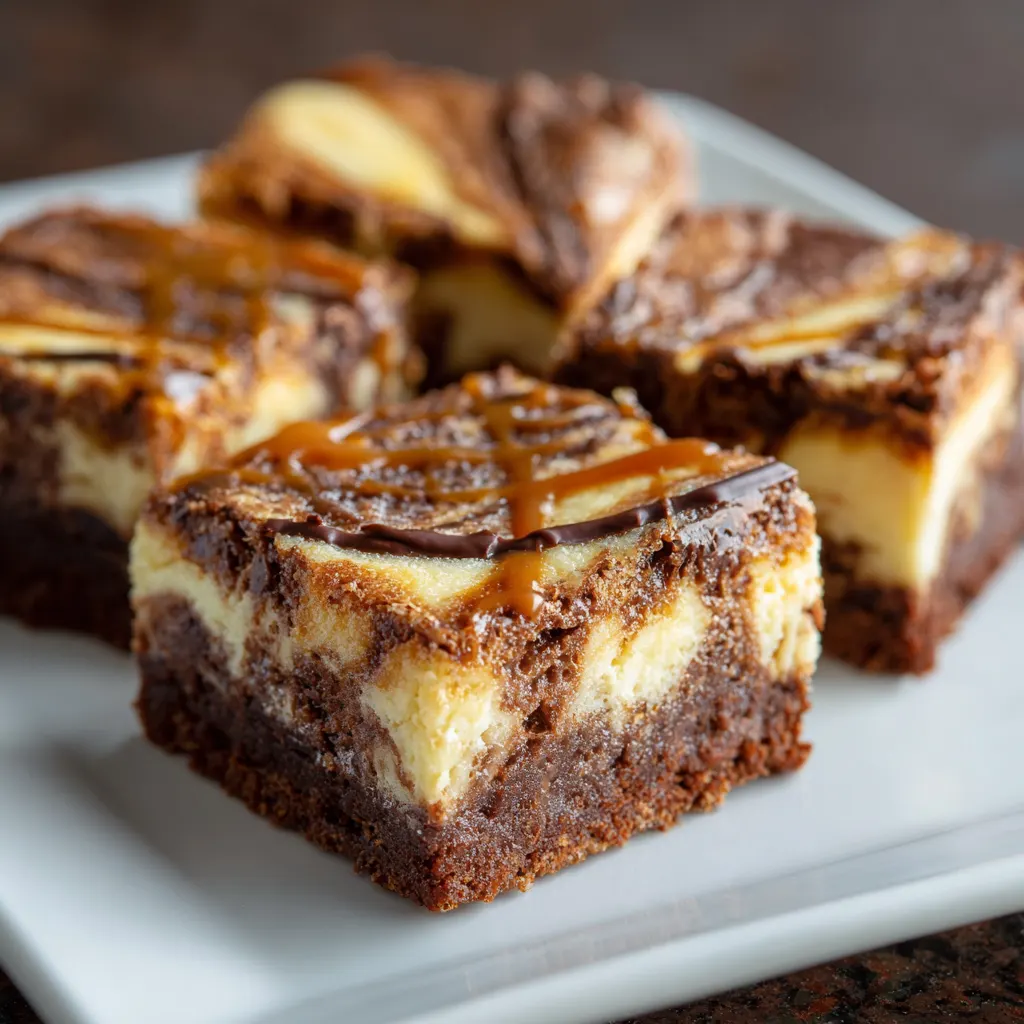
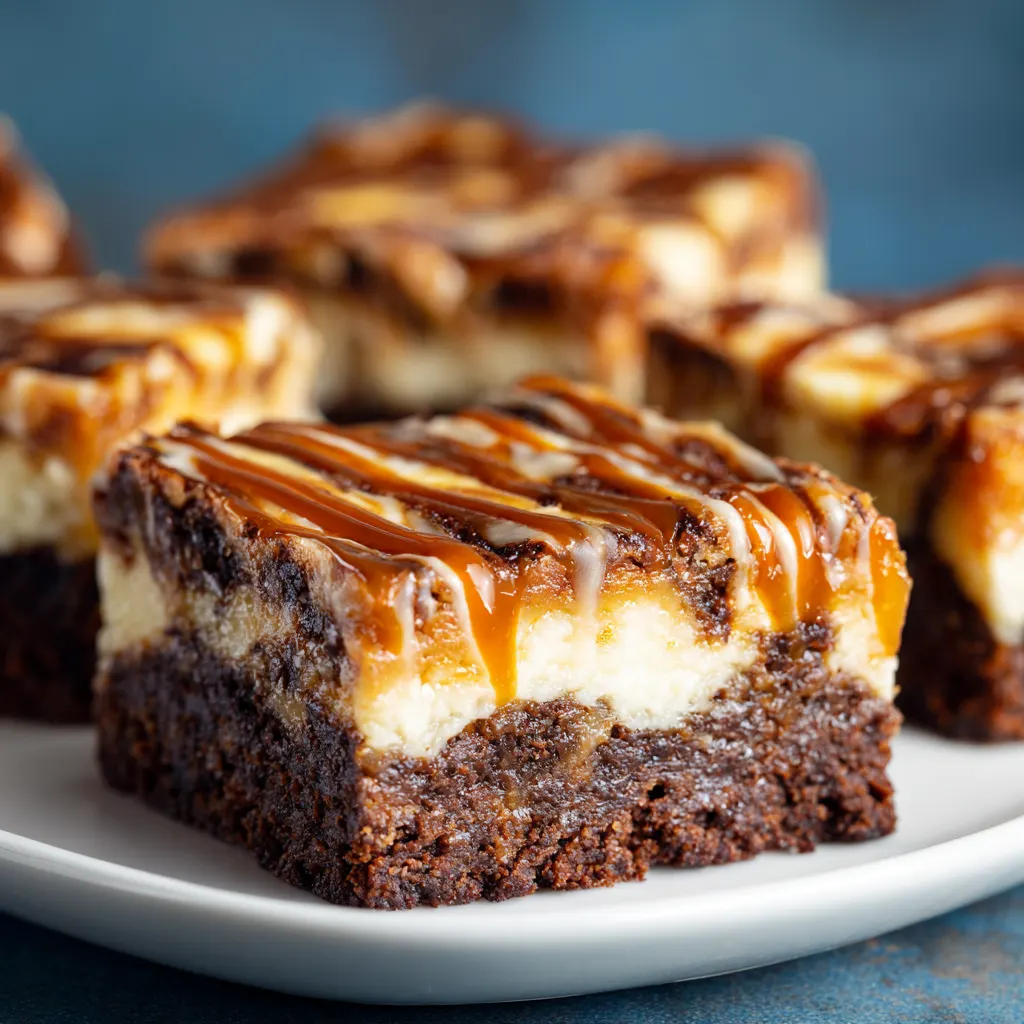
The Ultimate Caramel Swirl Cheesecake Brownies
When you cannot decide between a fudgy chocolate brownie, a creamy New York-style cheesecake, and the buttery richness of salted caramel, these Caramel Swirl Cheesecake Brownies offer the perfect solution. This dessert is a masterclass in contrasting textures and flavors, featuring a dense, cocoa-rich base topped with a tangy cheesecake layer and finished with ribbons of golden caramel. Whether you are baking for a special occasion or simply looking to elevate your weekend dessert game, this recipe delivers a professional-grade result that is surprisingly simple to achieve at home.
Ingredients
For the Brownie Layer:
-
3/4 cup unsalted butter, melted and slightly cooled
-
1 1/2 cups granulated sugar
-
2 large eggs, room temperature
-
2 teaspoons pure vanilla extract
-
1/2 cup high-quality Dutch-processed cocoa powder
-
3/4 cup all-purpose flour
-
1/4 teaspoon salt
For the Cheesecake Layer:
-
8 ounces full-fat cream cheese, softened to room temperature
-
1/4 cup granulated sugar
-
1 large egg, room temperature
-
1/2 teaspoon pure vanilla extract
For the Caramel Swirl:
-
1/3 cup thick salted caramel sauce (homemade or high-quality store-bought)
-
Optional: Flaky sea salt for finishing
Step-by-Step Instructions
-
Preparation: Preheat your oven to 350°F (175°C). Grease an 8×8-inch square baking pan and line it with parchment paper, leaving an overhang on two sides to easily lift the brownies out later.
-
Mix the Brownie Batter: In a large mixing bowl, whisk together the melted butter and 1 1/2 cups sugar until well combined. Add the two eggs and 2 teaspoons of vanilla, whisking vigorously for about one minute until the mixture is smooth and slightly pale. Sift in the cocoa powder, flour, and salt. Fold the dry ingredients into the wet using a spatula just until no streaks of flour remain. Do not overmix.
-
Reserve and Spread: Remove about 1/2 cup of the brownie batter and set it aside. Pour the remaining batter into the prepared baking pan, spreading it into an even layer with an offset spatula.
-
Prepare the Cheesecake Filling: In a medium bowl, beat the softened cream cheese and 1/4 cup sugar together until completely smooth and creamy. Add the egg and vanilla, beating on low speed until just incorporated. Be careful not to whip too much air into the mixture.
-
Layering: Spoon the cheesecake mixture over the brownie base and spread it gently to the edges. Take the reserved 1/2 cup of brownie batter and drop small dollops over the top of the cheesecake layer.
-
The Caramel Swirl: Using a spoon, drizzle the caramel sauce over the top of the brownie dollops and cheesecake. Use a thin knife or a wooden skewer to gently swirl the layers together in a figure-eight motion. Avoid over-swirling; you want distinct ribbons of cheesecake, chocolate, and caramel.
-
Baking: Bake for 35 to 40 minutes. The edges should be set and slightly pulling away from the sides of the pan, while the center should have a very slight jiggle.
-
Cooling and Slicing: Remove from the oven and sprinkle with flaky sea salt if desired. Allow the brownies to cool completely in the pan at room temperature, then refrigerate for at least 2 hours (or overnight) before slicing. This ensures the cheesecake layer sets and the brownies develop a fudgy texture.
The Science of the Perfect Fudgy Brownie Base
The foundation of a great cheesecake brownie lies in the texture of the chocolate layer. Unlike “cakey” brownies, which rely on chemical leaveners like baking powder and a higher flour-to-fat ratio, a fudgy brownie depends on the aeration of eggs and the quality of the fats used. By whisking the sugar and eggs thoroughly before adding the dry ingredients, you create a delicate meringue-like structure that results in that coveted crackly top while maintaining a dense, moist interior.
Using Dutch-processed cocoa powder is highly recommended for this recipe. Because Dutch cocoa has been treated with an alkalizing agent to neutralize its acidity, it possesses a darker color and a smoother, more mellow chocolate flavor compared to natural cocoa powder. This provides a sophisticated backdrop that doesn’t compete too aggressively with the tang of the cream cheese. Furthermore, using melted butter rather than creamed butter ensures the brownie remains chewy and heavy, providing enough structural integrity to support the creamy cheesecake and caramel layers above.
Mastering the Cheesecake and Caramel Ribbon Technique
The visual appeal of these brownies comes from the intricate marbling on the surface. Achieving this requires a delicate balance of viscosity. If your cheesecake batter is too thin or your caramel sauce is too watery, the layers will bleed into one another, resulting in a muddy brown appearance rather than distinct swirls. Ensure your cream cheese is at true room temperature before mixing; cold cream cheese will leave lumps that disrupt the swirling process.
When it’s time to create the “swirl,” the key is restraint. Many bakers make the mistake of over-mixing the top layers, which blends the flavors into a single, homogenized taste. By using a skewer and moving in wide, deliberate loops, you preserve the individual identities of the tangy cheesecake, the sweet caramel, and the deep chocolate. The caramel, in particular, should remain in concentrated pockets so that each bite offers a different flavor profile—some more cheese-forward, others dominated by buttery sugar.
Why Temperature Control is Non-Negotiable
Baking with dairy products like cream cheese and eggs requires precision regarding temperature. If you add cold eggs to a warm brownie batter or use cold cream cheese for the filling, the fats will seize, and the emulsion will break. This leads to an uneven bake and a grainy texture. For the smoothest possible cheesecake layer, take your ingredients out of the refrigerator at least 60 to 90 minutes before you begin.
Furthermore, the cooling process is just as critical as the baking time. Cheesecake is essentially a custard; it continues to set as it cools. If you slice into these brownies while they are still warm, the cheesecake layer will be messy and the brownie base will crumble. Chilling the pan in the refrigerator after it reaches room temperature firms up the fats and sugars, allowing for those clean, professional-looking edges when you finally cut them into squares.
Essential Tips for Customization and Storage
While the standard recipe is a crowd-pleaser, there are several ways to customize these bars to suit your palate. For an added textural element, consider folding a half-cup of toasted pecans or walnuts into the brownie batter. The bitterness of the nuts provides an excellent counterpoint to the sweetness of the caramel. For a “turtle” inspired version, you can also sprinkle chocolate chips and extra caramel over the top five minutes before the baking time is complete.
Because of the dairy content in the cheesecake layer, these brownies must be stored in the refrigerator. When kept in an airtight container, they stay fresh and fudgy for up to five days. They also freeze remarkably well; simply wrap individual squares in plastic wrap and store them in a freezer bag for up to three months. When you’re ready to indulge, let a square sit at room temperature for about 15 minutes—this allows the caramel to soften slightly while the brownie remains chilled and dense, creating the ultimate eating experience.