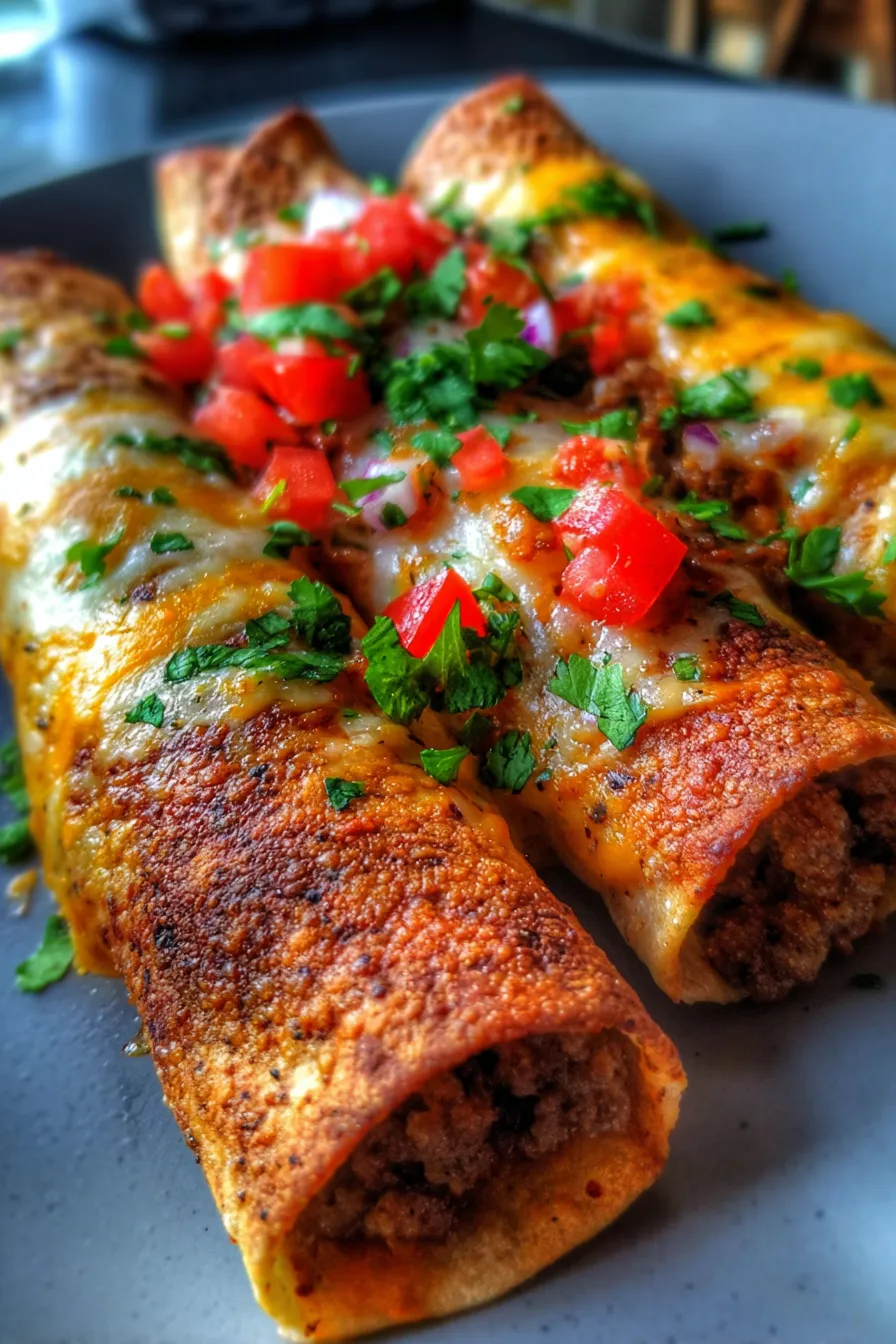
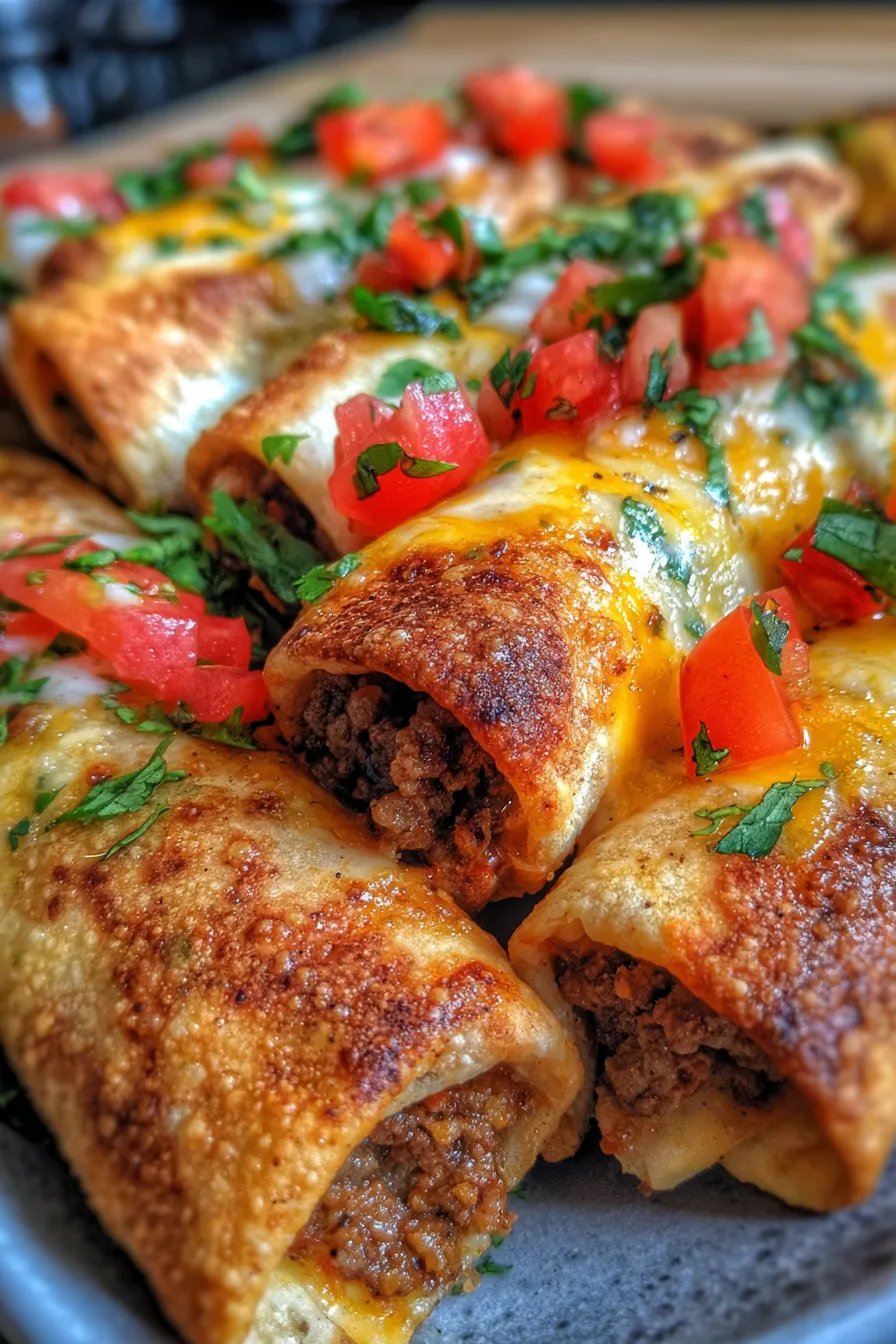
Best Ever Cheesy Taco Sticks – Your New Favorite Family Dinner!
Do you ever have those weeks where dinner feels like a constant puzzle? I know I do! Just last month, after a particularly wild Tuesday evening of juggling homework, after-school activities, and a sudden downpour, I looked in the fridge with a sigh. My family was craving something comforting and fun, and I was craving easy. That’s when inspiration struck for these incredible Cheesy Taco Sticks – Easy Family-Friendly Dinner Idea! They quickly became our new go-to easy dinner.
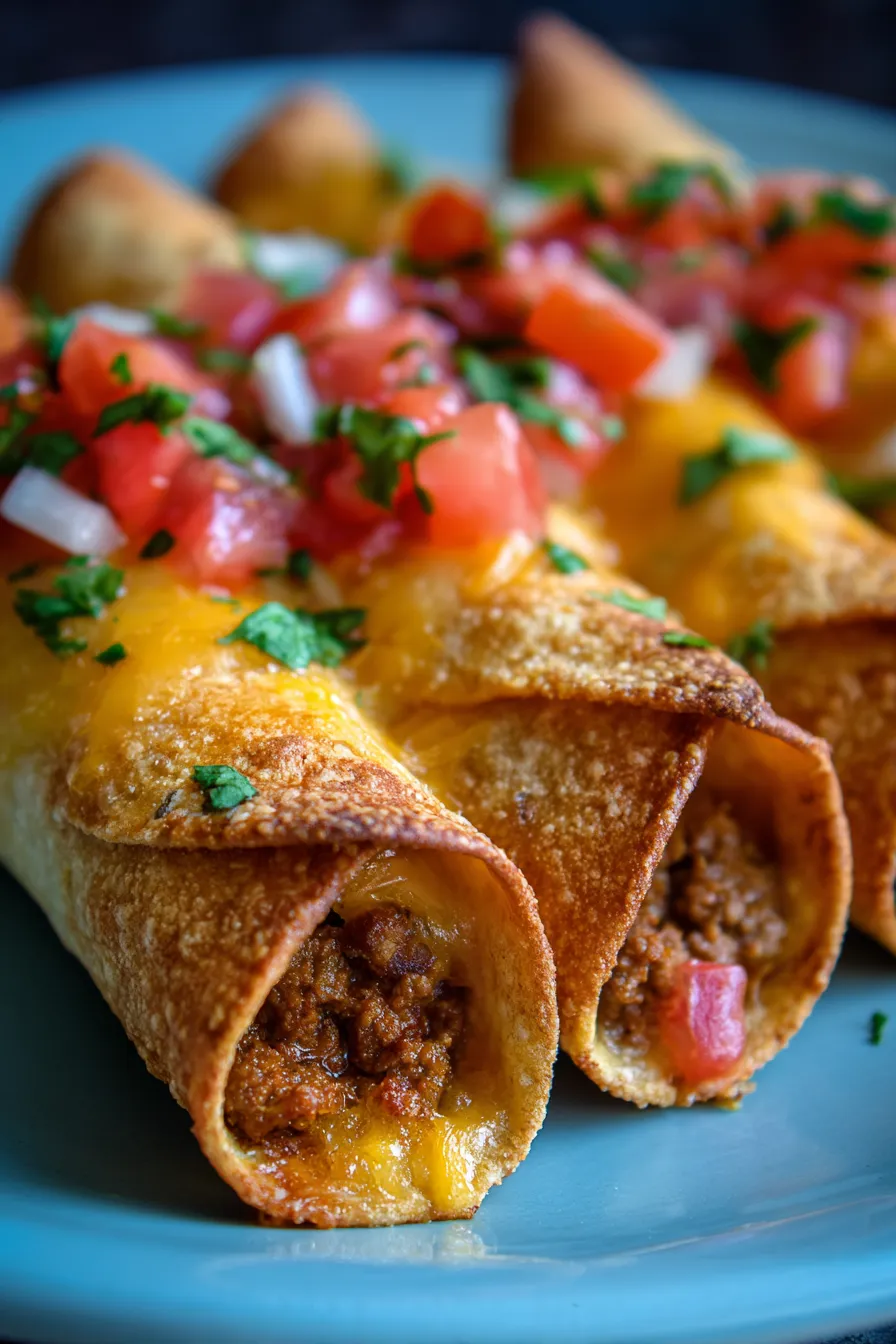
There’s something magical about transforming simple ingredients into a dish that brings smiles all around. These taco sticks are not just a meal; they’re an experience! Think all the beloved flavors of your favorite tacos, wrapped up neatly and baked or fried to crispy, cheesy perfection. It’s truly the ultimate comfort food for any day of the week, especially when you need a speedy weeknight meal solution.
This recipe is a tried-and-true family favorite in our home, thoroughly tested and approved by even the pickiest eaters. Forget the messy tortillas and let’s dive into creating these irresistible sticks that are guaranteed to disappear from the plate in record time!
Why You’ll Love This Recipe
- ❤️ Unbelievably Easy: Seriously, if you can roll a burrito, you can make these! Minimal fuss, maximum flavor. Perfect for busy weeknights when time is precious but you still want a homemade meal.
- ❤️ Kid-Friendly Champion: These are an absolute hit with kids! The fun stick shape, the melty cheese, and the familiar taco flavors make them irresistible. Say goodbye to dinner battles!
- ❤️ Customizable Fun: Everyone can personalize their taco sticks. Add corn, black beans, different cheeses, or even a kick of jalapeño for the adults. The possibilities are endless!
- ❤️ Mess-Free Deliciousness: No more crumbling taco shells or fillings spilling out. These sticks are neat, tidy, and perfect for little hands (or big ones!) to dip and enjoy. Less mess means less cleanup, which is always a win in my book.
- ❤️ Versatile Cooking: Whether you prefer to bake them for a lighter option or pan-fry them for extra crispiness, this recipe works beautifully both ways. We’ll cover both methods so you can choose what suits your family best.
- ❤️ Budget-Friendly: Made with common pantry staples and affordable ingredients, this recipe won’t break the bank. It’s a fantastic way to stretch your grocery budget without sacrificing taste or satisfaction.
- ❤️ Crowd-Pleaser: Planning a party or a potluck? These taco sticks are always a smash hit! They’re easy to make in large batches and are guaranteed to disappear quickly, making them perfect for entertaining.
- ❤️ Perfect for Meal Prep: You can prepare the filling and even roll the sticks ahead of time, storing them in the fridge until you’re ready to bake or fry. This makes dinner prep even faster when crunch time hits.
- ❤️ Dippable Delight: Part of the fun is dipping! Serve these with all your favorite taco condiments – salsa, guacamole, sour cream, queso, or even a zesty ranch. Every bite is an adventure.
- ❤️ Pure Comfort Food: There’s something so satisfying about warm, cheesy, savory goodness. These taco sticks hit all the right notes for a truly comforting and satisfying meal that will leave everyone happy.
What You Need
You only need a few simple pantry staples for this recipe! From seasoned ground meat to your favorite melty cheese and the magical wrappers that hold it all together, everything comes together effortlessly. Check the full printable recipe card below for detailed measurements and a complete list of ingredients.
Expert Tips
- 💡 Choose Your Wrapper Wisely: While small flour tortillas (taco or fajita size) are classic, egg roll wrappers or even spring roll wrappers can also be used for an extra-crispy exterior. Each offers a slightly different texture, so experiment to find your favorite!
- 💡 Don’t Overfill: It might be tempting to stuff them to the brim, but a modest filling (about 2-3 tablespoons) works best to ensure easy rolling and prevent bursting during cooking. Less is more for structural integrity!
- 💡 Seal the Deal: For tortillas, a little water or egg wash along the edges will help them stick together beautifully. If using egg roll wrappers, the natural stickiness usually suffices, but a dab of water can provide extra security. A tight roll is key!
- 💡 Baking vs. Frying:
- Baking: For a healthier, less greasy option, bake at 400°F (200°C) for 15-20 minutes, flipping halfway, until golden and crisp. A light brush of oil helps with browning. This method is fantastic for cooking large batches simultaneously.
- Pan-Frying: For ultimate crispiness, shallow fry in about 1/2 inch of vegetable oil over medium heat. Fry for 2-3 minutes per side until deeply golden brown. Don’t overcrowd the pan; work in batches to maintain oil temperature and ensure even cooking. Drain on a wire rack over paper towels.
- 💡 Drain Excess Fat: If using ground beef, always drain off any excess fat after cooking. This prevents your taco sticks from becoming greasy and ensures the filling holds together better. A leaner ground meat, like 90/10, also helps.
- 💡 Spice It Up (or Down!): Adjust the taco seasoning to your family’s preference. For more heat, add a pinch of cayenne pepper or finely diced jalapeños to the filling. For a milder flavor, use less seasoning or a mild blend. You can even make your own taco seasoning!
- 💡 Cheese, Please! Shred your own cheese from a block for the best melty results. Pre-shredded cheeses often contain anti-caking agents that can hinder smooth melting. Cheddar, Monterey Jack, or a Mexican blend are all excellent choices.
- 💡 Cool Before Serving (Slightly): Fresh out of the oven or pan, the filling will be extremely hot. Let them rest for a few minutes before serving to prevent burns and allow the cheese to set slightly, making them easier to handle.
- 💡 Batch Cooking & Freezing: These taco sticks are excellent for making ahead. You can prepare the filling and even roll the sticks, then freeze them uncooked on a baking sheet before transferring them to a freezer bag. Bake from frozen, adding a few extra minutes to the cooking time.
- 💡 Serve with Flair: Don’t forget the dippers! Salsa, sour cream, guacamole, queso, cilantro-lime crema, or even a simple hot sauce elevate the experience. A sprinkle of fresh cilantro and a squeeze of lime juice also add a bright finish. Consider a “taco bar” style presentation with various toppings.
- 💡 Uniformity for Even Cooking: Try to make your taco sticks roughly the same size and thickness. This ensures they cook evenly and prevents some from burning while others are still undercooked. Precision pays off!
Variations & Substitutions
Get creative with your taco sticks! This recipe is incredibly adaptable, making it easy to cater to different tastes and dietary needs.
- Leaner Protein: Swap ground beef for ground turkey, chicken, or even a plant-based crumble. Adjust seasoning as needed.
- Veggie Power: Add finely diced bell peppers, corn, black beans, or sautéed onions to the meat mixture for extra nutrients and flavor. Ensure any added veggies are cooked and drained of excess moisture.
- Keto/Low-Carb: Use large cheese slices or low-carb tortillas as wrappers. You can also make a “taco bake” without a wrapper, pressing the filling into a casserole dish and topping with cheese.
- Gluten-Free: Opt for gluten-free tortillas or even large lettuce cups (though they won’t be “sticks”). Ensure your taco seasoning is also gluten-free.
- Vegan/Vegetarian: Use a plant-based ground crumble, add more beans and corn, and use a dairy-free cheese alternative. Ensure your wrappers are egg-free if going fully vegan.
- Spice Twist: Experiment with different spice blends like fajita seasoning, chipotle powder for smoky heat, or even a pinch of smoked paprika.
Storage & Freezing
These Cheesy Taco Sticks are fantastic for making ahead or enjoying as leftovers!
- Refrigeration: Store cooked and cooled taco sticks in an airtight container in the refrigerator for up to 3-4 days.
- Reheating: Reheat in a preheated oven or air fryer at 350°F (175°C) for 10-15 minutes, or until warmed through and crispy. Microwaving is an option, but they won’t be as crispy.
- Freezing Cooked Sticks: Once completely cooled, place cooked taco sticks in a single layer on a baking sheet and freeze until solid (about 1-2 hours). Transfer to a freezer-safe bag or container and freeze for up to 2-3 months. Reheat from frozen in the oven or air fryer, adding about 5-10 minutes to the cooking time.
- Freezing Uncooked Sticks: Prepare and roll the taco sticks as directed. Place them in a single layer on a parchment-lined baking sheet and freeze until solid. Transfer to a freezer-safe bag, separating layers with parchment paper, and freeze for up to 1 month. When ready to cook, bake or pan-fry from frozen, adding extra cooking time until golden and cooked through.
FAQ
Q: Can I use chicken instead of ground beef?
A: Absolutely! Ground chicken or turkey would work wonderfully in this recipe. Just make sure to season it well with taco seasoning, as poultry tends to be milder in flavor. Cook it through and drain any excess liquid before assembling your sticks.
Q: What are the best tortillas to use for these taco sticks?
A: Small flour tortillas, often labeled “taco size” or “fajita size,” are ideal because they are pliable and easy to roll. You could also use egg roll wrappers for an even crispier result, but they might be a bit larger so adjust your filling amount accordingly. Corn tortillas are generally too brittle for this stick format unless you warm them very well to make them more pliable, but they might still crack.
Q: How do I prevent the taco sticks from becoming soggy?
A: The key to avoiding sogginess is to ensure your meat filling is not too wet. Drain all excess fat or liquid from the cooked ground beef. If you’re adding salsa, use a thicker variety or drain some of its liquid. Also, for baked sticks, don’t overcrowd the baking sheet to allow for even air circulation and crisping. For pan-fried, ensure the oil is hot enough.
Q: Can these be made vegetarian?
A: Yes! You can easily make these vegetarian by substituting the ground beef with a plant-based crumble, seasoned black beans, or a mixture of finely diced and sautéed vegetables like mushrooms, bell peppers, and corn. Ensure your chosen wrapper and cheese are also vegetarian-friendly.
I truly hope these Cheesy Taco Sticks become a fun and flavorful staple in your family’s meal rotation, just like they have in ours! They’re the perfect blend of comfort, convenience, and deliciousness. Don’t forget to Pin this recipe for later so you can easily find it whenever that taco craving hits. Enjoy every cheesy, crispy bite!

Best Ever Cheesy Taco Sticks – Your New Favorite Family Dinner!
Ingredients
- 1 lb ground beef (80/20 or leaner)
- 1 (1.25 oz) packet taco seasoning
- 1/2 cup water
- 12 small flour tortillas (taco or fajita size)
- 2 cups shredded cheddar cheese (or Mexican blend)
- Vegetable oil, for frying or brushing (if baking)
- Optional: diced onions, jalapeu00f1os, corn, black beans for filling
- Optional for serving: salsa, sour cream, guacamole, hot sauce, cilantro
Instructions
- Step 1 In a large skillet, brown the ground beef over medium-high heat. Drain off any excess fat. Add taco seasoning and water, stir well, and simmer for 5-7 minutes until the liquid has mostly evaporated.
- Step 2 Lay a tortilla flat. Spoon about 2-3 tablespoons of the seasoned ground beef mixture slightly off-center. Top with about 2 tablespoons of shredded cheese.
- Step 3 Fold one side of the tortilla over the filling, then fold in the shorter sides. Roll tightly from the filled end to create a stick shape. Moisten the last edge with a dab of water to seal if necessary.
- Step 4 Repeat with the remaining tortillas and filling.
- Step 5 To bake: Preheat oven to 400°F (200°C). Lightly brush the taco sticks with vegetable oil and place seam-side down on a baking sheet. Bake for 15-20 minutes, flipping halfway, until golden brown and crispy.
- Step 6 To pan-fry: Heat about 1/2 inch of vegetable oil in a large skillet over medium heat. Carefully place taco sticks, seam-side down, in the hot oil (do not overcrowd). Fry for 2-3 minutes per side, until deeply golden brown and crispy. Remove and place on a wire rack lined with paper towels to drain excess oil.
- Step 7 Serve warm with your favorite taco toppings and dipping sauces like salsa, sour cream, or guacamole.